How to make a bun for long hair. Self-construction of a hairstyle with a bun. Long hair bagel
In many situations, bunched hair looks much neater and more stylish than loose strands or carefully styled curls. This hairstyle is out of style and time, it suits everyone, except for women of age with gray hair - it makes them old and turns them into “grandmothers”. In this case, a modern, neat haircut would be ideal. For young women and young girls, the bundle is very suitable for the face, it is fashionable and has many options. To make a hairstyle look modern, you need to know how to do it right and quickly.
Features of performing a bundle of short hair
If desired, you can make a bun from short hair. To do this, you need a bob-type haircut and hair length at least to the shoulders. It may not be possible to wrap the strands in a classic bun, but you can wind them on curlers or on a curling iron and fix the curls in the form of a slightly careless, but lush and stylish bunch. Place it on the back of your head, not too low.
To work, you will need a soft elastic band, invisible hairpins or hairpins, a styling product, a curling iron or curlers, and for thin hair, a special comb for blunting (combing).
If you schedule the work step by step, you get the following sequence of operations:
- Treat the ends of the hair with a styling product and wind the curls.
- Gather the hair at the back of the head with an elastic band.
- Brush each strand lightly at the base to add volume and fluffiness to the bundle.
- Gently straightening the strands, style the curls so that they give the impression of a bun made of curly hair.
- Secure your hairstyle with invisible hairpins or hairpins.
- Fix with a light varnish in a spray.
To make such a bun look organic, it is worth pulling out several thin strands from the hairstyle. If your hair is very short, you can pick up overhead strands, ready-made hairpieces and even already decorated bunches with decor - it is important to choose them exactly to match the hair. Good quality natural or kanekalon hairpieces can blend in perfectly with your own curls and be completely indistinguishable even upon close examination.

Features of performing a bundle of long and medium hair
A bun for long hair is a real classic. These hairstyles never go out of style and look great on all hair types. They can be paired with a variety of bangs, use special pads for volume, or left natural. Bundles can be made for medium length hair, the main thing is to follow simple rules:
- It is difficult to make a bun on very clean hair - it quickly crumbles. It is better to do this hairstyle on the second day after washing.
- To fix the tail under the bun, you need to choose an elastic band to match the hair and from a soft material so as not to injure the hair.
- Tufts can be very diverse, they can be decorated with various hairpins, brooches, scarves and other decorative elements.
At home, making yourself a bundle is not at all difficult. The hair must be carefully combed, collected with an elastic band in a ponytail and twisted around its base. The hairstyle can be diversified - divide the hair into strands and twist them with a tourniquet, and then collect it in a bun, gently intertwine the strands together to obtain a natural and voluminous bun, even braid it into a braid, and then wrap it in an elastic band - you get a strict hairstyle "a la school teacher. "
Varieties of beams
A hairstyle with a bun is a grateful basis for experimenting with your appearance. You can collect strands in a smooth and tight bun very high on the crown, like a ballerina. Such a somewhat childish bun is suitable for girls with regular and thin facial features and good, dense hair. If they are thin, the bunch may be small, which will further enhance the sensation of "liquid" curls.
Lush thick hair can be styled in different ways - gather in a knot at the back of the head, place it on the crown of the head, make an asymmetrical bun, and so on. There are many types of bundles, and their choice depends only on the desire of the hostess and the condition of her hair. It is not difficult to make beams, and the result is great. But this type of hairstyle can be tricky - if you make a mistake with the choice of technique or choose the wrong outfit, it can seem outdated or add age, and no one needs it.
Vanilla bunch
Previously, girls of this type were called Turgenev, but now they have acquired the name vanilla. Naturally, their favorite hairstyle bears the same name. This is a soft, feminine and very simple bun, which will take a minimum of time and accessories to create - an elastic band, a comb, hairpins, and, if desired, hairspray to fix the finished bun.
The vanilla bun has some peculiarities - it should not be too neat, "sleek", protruding short hairs give it a special charm, as if a girl just got out of bed and just twisted her hair into a bun. And another very important feature - a bunch of vanilla is made only on the top of the head.
To create it, you need to comb the hair, lift the strands up, securing them at the crown of the head in a ponytail. Comb the collected hair again and gently twist around the base of the tail, securing with hairpins. The finished hairstyle can be varnished, but you should not get carried away - the bun should look somewhat relaxed and at ease.

Sloppy bunch
This hairstyle looks like it was done on the go, however even such a simple bun requires certain knowledge and skills.
Usually this is a low bundle, it can be located asymmetrically, tied so that not even individual hairs, but whole strands, but thin, graceful ones, are knocked out of it. You can not fix your hair with an elastic band in the ponytail, but immediately wrap it around its axis, not too tightly. This makes the bun look more natural and relaxed.

Bundle with a bagel
A special lining made of foam rubber in the shape of a donut or donut allows you to get a beautiful high bun with a clear shape. The choice of donut size depends on what size you want to get a bun, while taking into account both the length and texture of the hair.
Now, most often they make a large bundle with a donut, located high on the head. To create it, you will need a donut itself to match the hair (they are available in different colors - for blondes and brunettes, you can even find for redheads), two elastic bands, a comb, a bristle brush for smoothing strands, hair spray.
The hair is carefully combed with a natural bristle brush - so the hair becomes smooth and pliable. Then the head needs to be lowered down, comb the strands and collect them high on the top of the head in a tail. Put a donut on the tail and gently distribute the strands of the tail over its surface. Put on a second elastic band on top, which will fix the hair on the surface of the donut. Carefully tuck the protruding strands under the base of the donut and secure the entire hairstyle with hairpins to match the hair. For reliability, the finished bundle can be varnished.

Volumetric beam
A fashionable and effective volumetric bun is quite easy to make. The main condition is that the hair is in good condition and preferably on the second day after washing, as too “fresh” strands fall apart, and a voluminous bun can quickly crumble. If your hair is still very clean, you can use styling products such as texturizing paste.
The easiest way to make a bun is without fixing it with an elastic band or tying it not too tight. You can use a fashionable "trick" - invisiboble elastic in the form of a piece of telephone cord. She does not pull hair and allows you to collect it in a not too tight ponytail.
The entire mass of hair must be divided into several strands and gently woven together. An important condition is that the hair does not need to be pulled too tight, otherwise the required volume will not be obtained. If the hair is very thin or runny, the strands can be combed lightly along the length, but not overly zealous.
Interlaced or gently twisted strands are folded into a knot, secured with hairpins. The bunch should be soft. If the volume is not enough, you can slightly "stretch" it, making it more lush.

Bun in bridal hairstyle
The use of a bun in wedding hairstyles is a very long tradition, so it is much easier to fix a tiara or a wreath with a veil on the bride's head. This hairstyle looks very beautiful and emphasizes the beauty and tenderness of the bride.
To get the perfect look, you need to carefully collect your hair and carefully secure the bun. Not a single bride will like it if, in the middle of a celebration, her hairstyle begins to collapse. This alone can ruin the whole mood.
Very often, in a bride's hairstyle, a bun is collected from hair twisted into curls. They are gently lifted up, smoothing the sides with a bristle brush for a flawless hairstyle. High on the crown, strands are fixed with an elastic band to match the hair so that it is not noticeable, then each curl is laid around the base of the tail. The strands are fixed with invisible ones, as the pins can easily "pop out".
You can easily attach an orange blossom wreath with a veil around such a bundle, or place other wedding decorations.


Bun with a sock base
If you want to make a big stylish bundle, but you don't have a donut or a roller at hand, you can use the "improvised means" - a regular sock. You need to choose a product of medium length, from soft, rather loose knitwear, without a pattern that is as close as possible to the shade of the hair color.
Making a hairstyle based on a sock is very simple. To do this, a part at the toes is cut off at the toe, and the remaining "pipe" is rolled up into a volumetric ring. Then everything is extremely simple - a sock ring plays the role of a classic donut. In the same way as with the finished donut, the toe ring is put on the base of the tail, the hair is straightened, pressed with an elastic band and tucked under the bun. It is enough to fix with hairpins, sprinkle with varnish - and a fashionable stylish hairstyle is ready!
Bundle with a roller
You can create a stylish bun quite quickly if you use a special foam roller. It matches the color of your hair and has a button fastener at the ends. To get a hairstyle, you need to connect the strands in a ponytail, and then gently wind the strands on a roller, starting from the bottom and pressing the ends of the hair with your fingers.
When the roller with the hair wound on it rises to the elastic, the ends are connected, buttoning the button. Now all that remains is to gently straighten the hair in place of the fastener so that it is not visible, and secure with hairpins.

A bun with a fleece
This type of bun is especially suitable for very fine hair, as it will be very difficult to create from them without combing into something. "Gulka" can turn out to be very small, especially if there is not enough hair. Combing will quickly correct this situation.
You can make a simple volumetric bun by combing it in separate strands, smoothing them with a brush and bringing them together. But you can go the other way. You can comb the hair over the forehead and on the crown, leaving smooth strands on the sides. By styling your hair high like a coca, you can make a fairly lush bun at the top or back of the head. The result is a retro hairstyle that perfectly matches the style of the 60s.
This hairstyle must be done very carefully, otherwise the combed areas will be noticeable, and the bun will be untidy and ugly. It ages and makes the overall look out of date.

Options for beautiful hairstyles using a bun
Based on the bun, you can create many options for hairstyles that can be worn every day and used as an addition to a holiday outfit.
A bun with loose hair is one of the simplest and most stylish options. It's easy to do. It is necessary to collect the upper part of the hair as for the "Malvina", secure it with an elastic band at about the level of the back of the head, and collect the strands in a soft bun, securing it with hairpins or a decorative hairpin. The free ends of the hair can be straightened with an "iron" or twisted with a curling iron spiral curls.
To get a neat little onion on the head, the hair must be treated with styling foam and combed with a bristle brush until completely smooth. Collect the hair in a ponytail and twist it tightly, pinning it with hairpins. From above, treat the bundle with a gel for fixing and shine. You can place this type of beam anywhere - on the top of the head or on the back of the head. A sleek hairstyle like this looks good with straight, tight bangs.

For young and daring girls, the bundle gives a huge scope for imagination. You can do two tufts on the sides of the head in the style of Princess Leia from Star Wars, or a tall, cylindrical beetle comes in handy to create a cosmic look. To make it is not as difficult as it seems, you only need a few "terry" hair ties, which are put on the ponytail until the desired height is reached, and then wrapped in loose hair. The result is an original cylindrical bun that looks stylish with leather and neoprene outfits.
The bun goes well not only with sleekly tied hair.
- Strands can be left loose for a casual boho look, aristocratic styling with glossy styling products, or texturizing paste and hair clay.
- If you use special salt sprays, you can create a special texture in the style of a surfer's girlfriend. Such hair has a slight waviness, which gives volume, so the bun will turn out to be loose, textured and very modern.
Young ladies can have a little fun and make cute horns from bunches using the same technique as when creating a kultyka. Weaving, which is still fashionable this season, can be combined with bunches. Various braids and "lattices" will neatly shape the head, and you can not hide the free ends of the hair, but make bunches of them. Depending on the type of weaving, these can be flat bundles, "shells", dense "bumps" or thin braided braids tightly rolled into a roll.
Stylish girls with thick and long hair will fit a half bun in the style of Angelina Jolie. To do this, you need to give the strands shine and smoothness, collect them in a high tail, separate a sufficiently voluminous strand and wrap it around the base of the tail. This hairstyle will look very impressive on well-groomed long hair cut in a straight line.
The bundle can be as diverse as your imagination allows. Introduce overhead strands, braids and curls into it, use hairpins, bows and ribbons, experiment with overlays - the bun can be amazingly beautiful. This hairstyle will never go out of style and will look modern and stylish if you follow our simple guidelines and descriptions.


In every responsible and serious girl there is a girl: naughty, playful and perky. With the help of clothes, makeup, hairstyles, we create images that determine our actions, behavior, gait, posture. What image do you get in your mind when the bun hairstyle is mentioned?
Such a hairstyle is able to relax a girl, relieve her of all the responsibility and burden of household issues for a while, that is, pull the girl out of her: reckless, smiling and mischievous, and the trends of 2018-2019 are only favored by this. The hairstyle of the bun, in other words, bunches, knots, horns, has been relevant for several years. In this article, we will look at how to make buns from two sides: classic, careless, formal, with loose hair and others, that is, the most trendy buns of the current year.
Types of hairstyles. Two buns on the sides
What are they like? Views:
- classic buns;
- voluminous, careless buns;
- buns with loose hair;
- buns using rollers;
- buns using false hair (preferably a color different from your hair shade).

The bun hairstyle can be performed on different hair lengths, thin and thick, straight and curly, short and long. At the same time, it takes a little time to decorate a hairstyle, and the image turns out to be a kind of "girl with a devilishness", either naive and playful, or gentle and romantic, or strict and official.

What is needed to perform side bumpers
To complete the bun hairstyle you will need:
- Comb.
- Hairpins or invisible.
- Thin elastic bands for attaching tails.
- Thick elastic bands for fixing the bundles (if necessary).
- Medium hold hair mousse or texturizing spray.
- Medium hold hairspray.
- Hair extensions (optional).
- Curling iron or iron (optional).
Below is a step-by-step scheme for performing the simplest bundles of all those proposed: these are voluminous, careless buns and bundles with loose hair.
Scheme of performing volumetric careless drone

- How to make two beams on the sides and create the required volume? To do this, first apply a medium hold mousse to semi-damp hair. The mousse will thicken the hair and create the necessary texture, due to this, the bundles will look more voluminous.
- Dry your hair using a hair dryer or naturally.
- Divide your hair into two sections. The parting can be straight or zigzag. Also, if you are used to wearing your hair to the side, part it on the side.
- Gather in two ponytails and secure with thin elastic bands. The height of the tails depends on the desired location of the buns. Leave a couple of locks on your face free if desired.
- If you have not used hair mousse, then a texturizing spray should be sprayed over your hair at this stage.
- Comb the ponytails lightly. If you have long or thick hair, no comb is required.
- You can also use a curling iron or iron to create volume and splendor of hair. To do this, make several curls from the ponytails, fluff them with your fingers and lightly sprinkle with hairspray.
- Now twist a tourniquet from the ponytail and wrap it around the elastic. Adjust the volume and sloppiness of the bundles by wrapping tightly around the elastic.
- Secure the bun with two or three pins. Make a second bun. Sprinkle varnish on the buns.
- Twist the strands around your face if desired. The hairstyle is ready.
How to make buns on both sides so that they add romance and femininity to your look? Try loose hair. It's perfect for dating and walking. Put on a dress and conquer your man. Or choose jeans or shorts with a T-shirt and go with your friends to the disco.
Scheme for performing buns with loose hair
Follow steps 1 through 3 from the previous diagram.
- Divide your hair into three sections. Two side pieces for ponytails and one piece of loose hair.
- From the side sections, make two ponytails for loose hair.
- Tie each ponytail into a tight braid.
- Wrap each harness around the elastic and secure the resulting bundles with invisible hairpins or hairpins. Sprinkle with varnish.
- Curl your loose hair with a curling iron or iron.
In the next video, you will clearly see how to make two bundles with loose hair.
Official gulki
This hairstyle is perfect for serious events and formal occasions. The formality of the bobbins will lie in the exceptional smoothness of the hair and the perfect smoothness of the bobbins.
Scheme for the execution of official gulek
- Wash your hair as usual.
- Apply a medium hold mousse to semi-damp hair. The mousse will thicken the hair and create the desired texture.
- How to make two bundles of hair for maximum smoothness? To do this, blow dry your hair using a hair dryer, pulling it out with a brush.
- Divide your hair into two sections. The parting can be straight, or on the side, but not zigzag. Moreover, it should be as even as possible.
- Gather your hair in two ponytails and secure with thin elastic bands.
- Twist the tails into bundles and wrap the elastic around the elastic as evenly and tightly. Secure the resulting buns with hairpins.
- For smooth tufts, the smallest rollers are often used. Each roller is put on a ponytail, hair is spread over it and secured with an elastic band.
- At the end, it is important to align and smooth each hair with varnish. Bows will add charm to this hairstyle.

Options for hairstyles with buns
Once you have mastered the basic bun styling technique, start experimenting and create many looks.
- From the resulting ponytails, make voluminous braids and wrap them around the elastic bands. How to make buns on both sides from two voluminous braids on thin hair? To do this, weave overhead strands into the braids. They will add volume to your braids.
- Twist the ponytails into tight bundles and wrap the bundles around the elastic bands, going up. This will give you trendy horns.

- After creating the ponytails, fasten the overhead strands of a contrasting color, twist into bulky bundles and fasten in the form of bunches. A stylish hairstyle is ready.
- Braid the tails into a French braid, place the buns over the ears, and decorate the base with ribbons. This will give you an anime hairstyle.
- Leave loose ends at the bunches for a stylish twist.
- Add braiding to the bundles and your look will be even more advantageous.

Stylish accessories for bundles
You can add personality to your hairstyle with hair jewelry. Decorate the bundles with ribbons, hairpins, beautiful elastic bands, or weave the lace into pigtails, put on a headband, add buns to the center or hairpins with flowers on the sides. How to make buns on both sides for special occasions? To do this, decorate your regular bunches with handmade jewelry.

Styling with two bundles is suitable for absolutely everyone, regardless of age, hair length and structure. The basic rule of an ideal and harmonious image is to choose the right bundle option. At the same time, a huge number of variations will allow each girl to find exactly her own, which will emphasize her individuality and beauty. How to make beams on both sides, depending on the features of the face and appearance?
All versions of bobbins are suitable for an oval face with a swan neck. They can be placed both on the top of the head and behind the ears. They can be tightly curled or sloppy.
The lack of a short neck can be eliminated by low-lying buns.
Girls of short stature can experiment with volumetric beams located on the top of the head. On them, this option will look more harmonious, in contrast to tall beauties.
Owners of tall stature should pay attention to tall, not voluminous buns. The tighter the buns are, the more harmonious the image will be. And don't forget the decorations.
A low bun is suitable for a square face.
How to make two tufts on the head to lengthen a round face, or cover imperfections on the face? To do this, you can create regular buns and release a couple of strands from the face.
Vary your hairstyles, try to wear and choose the most advantageous buns for your appearance, depending on your mood and the desired image, the upcoming event. Even if you are at home, start your morning with voluminous beams and you will see how your mood changes and the whole day will be positive. Don't forget your inner mischievous girl!
Divide the entire mass of hair into a parted part, make two tails and braid two flagella from them, securing at the end with a transparent elastic band.
When the flagella are ready, just twist them together several times and secure them with invisible ones.
Popular

Feminine low bun
How to make a beautiful bun on your head? Make a regular ponytail so that the strands around the face remain uncovered. Gently fold the tail into a "bun" and secure.
Now fold the right free strand to the left, wrapping it around the already finished bundle. Do the same with the left strand.
How to make a beautiful bow bun
First, make a high "bun" almost on the top of your head. Secure it with an elastic band so that a small ponytail looks out in front, and divide it into two parts, as in the picture.
Wrap this ponytail around the bundle, forming a bow. Secure with invisibility. Ready!
Smooth low beam
Make a regular ponytail, secure with an elastic band and part the hair into two sections just above it. Twist the tail through this loop.
Repeat the manipulation several times until the entire length of the hair is over.
Secure the finished bundle-"bagel" with pins. Optionally, you can decorate your hair with a flower barrette.
How to make a bun for long, brushed hair
Separate the top strand at the crown of your head and do a light bouffant. Then pull your hair back into a ponytail, but don't pull it tight.
A bunch - it is a bump or bun - is hair gathered up and twisted into a knot, secured with an elastic band and hairpins. Most often, the entire sheet of hair is involved, which allows you to emphasize the line of the neck, but it is permissible to leave some of the curls free to fall over the shoulders.
Depending on the type of beam (and there are several variations of this hairstyle), the complexity of its formation and the time spent differ. So, a sloppy bun can be twisted almost on the go with minimal effort... In general, it takes two to five minutes to create a pod. A more sophisticated bundle will require special accessories, some dexterity, and possibly extra hands.
If you decide that tomorrow you will certainly go out with a beam on your head, it is better to practice the day before. At the same time, you will understand how much time you need, and you will be able to allocate the required number of minutes so that you do not get ready in a hurry in the future. For a very complex hairstyle with a bun for a festive event, it is better to contact the master.
For hair below the waist, a bun is most likely not the best choice: it will simply fall apart due to the strong severity of the hair, besides, making it yourself, and even more so five minutes before leaving, is extremely problematic.
A bun is a fairly versatile hairstyle that owners of hair of any type can afford.
- Thin hair, tied in a classic high ponytail, often looks runny, but in a bun it will look elegant.
- Loose thick hair looks great, but because of the large volume, it can be very uncomfortable with it (and it is hot in summer). A bump collected on the back of the head is an excellent way out.
- A spectacular smooth bun can be done on straight long hair, but to create a romantic image, stylists advise you to curl the curls first, and then form a hairstyle.
- For curly hair, a bun is a practical way to wear hair between shampoos without bothering with styling.
How to do it yourself at home?
Below are the different ways to style your bun hairstyle from which you can choose the one that suits you best.
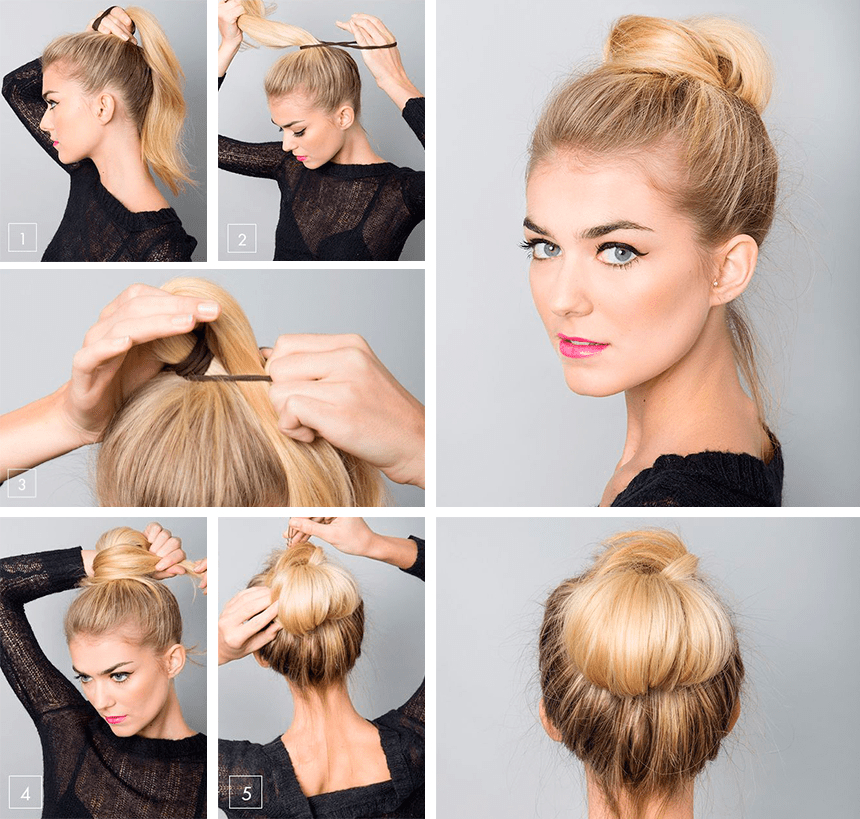
Classic bun with a donut
Suitable for various celebrations, including weddings. It turns out smooth and voluminous. To create this hairstyle, you will need hairpins or invisible hairpins, a comb, a nail polish for fixing, a regular thin elastic band and an elastic band in the shape of a donut.
- Tie your hair into a high ponytail, and then tie it in with an elastic band.
- Pull the tail through the donut so that the ring is at the base.
- Secure the roller on both sides with hairpins.
- Using a fine-toothed comb, divide the tail into two sections: the top and the bottom.
- Spread and fan the top of the hair over the right half of the donut, completely overlapping it. Only the part of the hair that is closer to the roots is used. You don't need to wrap the entire ring with hair yet, the strands should hang freely.
- Carefully go through the hair with a comb, sprinkle with varnish.
- Use hairpins to secure your hair in several places around the edges of the donut.
- Do the same with the second separated part of the hair and hide the left half of the roller under it.
- Now wrap the loose strands around the ring.
- Fix the resulting structure with pins, sprinkle with varnish.
We suggest watching a video on how to make a classic hairstyle with a donut:
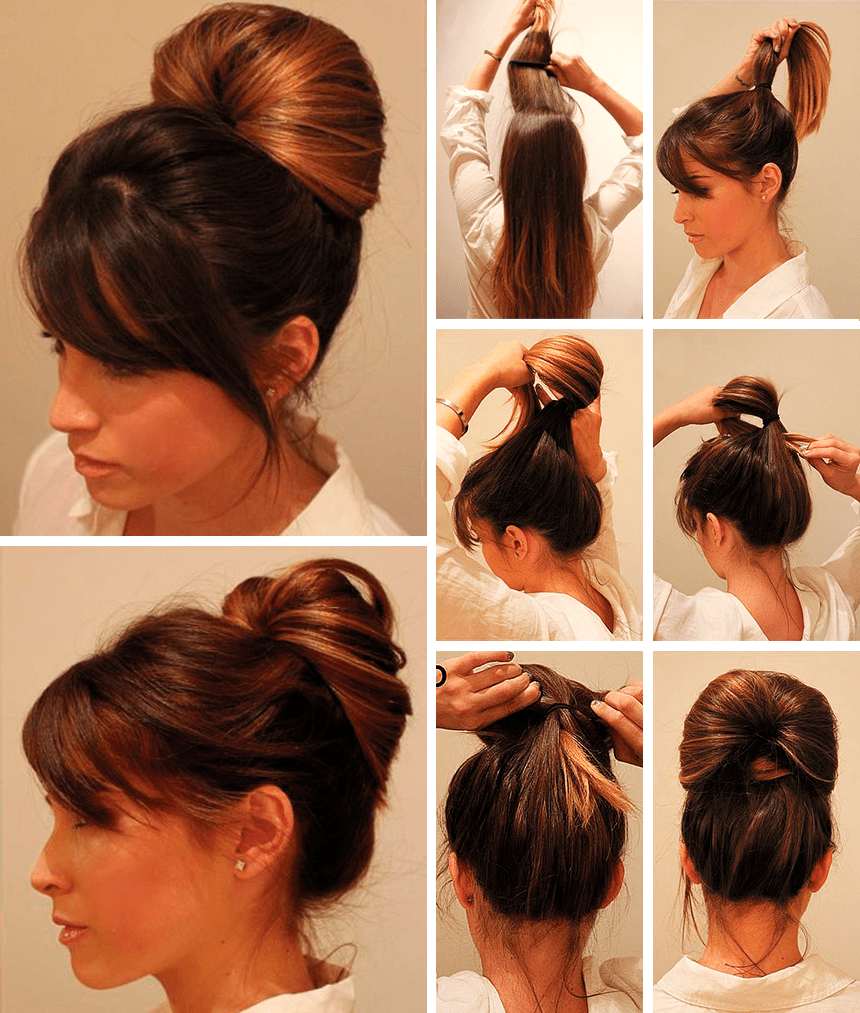
No bagel (toe)

If you do not have a special elastic band to create a voluminous beam, it is quite possible to do with an improvised means, namely a regular sock. The quality of the hairstyle will not be affected by this. In addition to the sock, you need to prepare all the same tools (except for the donut, of course). It is desirable that the color of the sock is close to the shade of your hair.... Choose a cotton or terry sock.
- Turn the sock inside out and make some wide cuffs, as if you were rolling up the sleeves on a shirt. The last lapel should be almost at the very toe. The toe is cut off with scissors.
- Comb and collect the hair in a ponytail, positioning it as high as possible, and secure with an elastic band.
- Thread the strands into the resulting sock ring, but do not bring it to the base. The ring should be closer to the end of the tail.
- Put the tip of the tail into the hole, then wrap the hair further along the length with the toe, approaching the very base.
- Gently straighten the resulting bun so that the sock does not show through anywhere.
- Secure the hairstyle with hairpins, fix with varnish.
This method is also suitable for those who find the professional bagel inconvenient to handle or too rough and loose to the touch.
We suggest watching a video on how to create a bun using a sock:
With an elastic band
Perhaps the easiest way to build a bun. Below are instructions for creating high and low beams.
Low bump

- Make a low, not tight ponytail. Twist it into a loose rope.
- Wrap around the base, covering the elastic with your hair.
- Take another elastic band (transparent, in the shape of a spiral) and pull it twice over the bundle, thereby securing it. Tuck the ends of your hair.
- Give the beam a beautiful shape and texture. To do this, gently gradually pull the strands out of the cone and lay them as you like, fixing with hairpins.
High

- Pull your hair through the hole of the elastic to about the middle or above; do not pull it over. The part captured by the elastic will be the bundle.
- Twist the elastic to make a loop.
- Close the bun with the ends of your hair, throwing it over the top.
- Tighten with an elastic band at the base. A soft, not too tight elastic band will do.
- Stretch the bun, give it volume and rounded shape with your hands.
- The protruding ends of the hair that did not fit under the elastic should be directed to the sides of the bump or wound behind it, pin.
- For more visual negligence, you can stretch out a couple of side strands and lift the hair at the roots.
How to collect trendy bun options?
Various options are selected for a particular image... Such bundles are not boring and can be alternated for a change.
Little on top with loose curls

A popular and relevant playful option. Differs in elementary and super-fast execution.
- Pull part of your hair back and tie it back. The thickness and volume of the bun will depend on the amount of hair in the tail.
- Gently wrap the gathered hair around the elastic. Hide the tips.
- Secure with hairpins. If you want the bun not to fit tightly to the crown of the head, use another elastic band instead of invisible ones.
Sloppy and simple

The most basic type of beam. It is assembled practically with closed eyes and very quickly - literally in seconds. Does not require any accessories, except for an elastic band and invisibility. The more tousled and fluffy the hairstyle is, the better..
- Gather the hair at the crown of your head in a ponytail and tie it with an elastic band.
- Twist the tail into a tourniquet.
- Wrap the tourniquet several times around the base of the tail, hide the protruding ends under the elastic.
- Use hairpins to prevent the bunch from breaking up.
If the hair is light and not too thick, you can do without an elastic band at all, securing the result with hairpins alone. Such a beam will be more airy.
We offer you to watch a video on how to make a sloppy bun of hair:
Voluminous curls

An elegant fluffy hairstyle, suitable for both a business meeting and a festive evening.
- Apply a lather or styling gel to your hair.
- Form a high ponytail, pull it well.
- Divide your hair into individual sections and curl each with a large curling iron.
- This is followed by alternately pinning curls under an elastic band, forming a kind of rose.
- For a fuller hairstyle, slightly lift the hair at the roots, gently prying it with a long, thin object, for example, a comb pen or a brush.
- Use varnish to set the result.
What can be supplemented with?
The bun does not have to be laconic; if desired, the hairstyle can be decorated with accessories or unusual hair braiding. As a stylish addition are used:
- tapes;
- bows;
- beads;
- brooches with fabric flowers;
- decorative feathers;
- hoops;
- unusual beautiful hairpins.
Also, loose strands can be braided into light braids or twisted into bundles, and then wrap them around the bump.
Photo
In the photo below you can see how the various options for buns on long curls look like.


Who is this hairstyle suitable for and in what cases will it be appropriate?
This type of hairstyle is traditionally common among dancers and ballerinas, because the hair is securely fixed, the strands are not knocked out and do not cause trouble. Also, the beam is a salvation for all hurrying, late and busy persons, since it can be built on the head in a matter of minutes.
A voluminous decorated bun is most appropriate for formal events and parties. It is permissible to curl your hair carelessly for a walk with friends or at home. For work, the option of a tight small bundle with no frills is suitable.
It is also worth paying attention to the combination of hairstyle, clothing, makeup and the correspondence of all these elements to each other. A modest bun is likely to be discordant with flashy makeup or a spectacular festive outfit. As well as pretentious complex bunch will be unprofitable to stand out against the background of a minimalistic image.
The next time you want to create something new, interesting and at the same time simple on your head, use the instructions and tips in the article for shaping and shaping the beam. You will like the result in the mirror!