Creative project for the house of my dreams. Presentation of the project on technology "home of my dreams". Technology of building a house from DURISOL blocks
To use the preview of presentations, create a Google account (account) and sign in: https://accounts.google.com
Slides captions:
Competition "The coolest cool" Balzhirova Handa Tsydendorzhievna MAOU Ivolginskaya secondary school The house of my dreams
Happy is he who is happy at home. L.N. Tolstoy
The house, as everyone has known for a long time, This is not a wall, not a window. Not even chairs with a table, this is not a house. Home is where you are ready to return Again and again, furious, gentle, Good and evil, barely alive ... Home is where you will be understood, Where you hope and wait, where you Forget about the bad - this is your home!
When the sun is warm - when the mother is good. In the native family and the porridge is thicker. The bird is happy for spring, and the baby is happy for its mother. Being a guest is good, but being at home is better. The house is beautiful not with corners, but with pies.
Children are not a burden, but a joy. The bird is strong with its wings, the family is strong in friendship. The deeper the roots, the higher the crown. Parental home - the beginning of the beginning. There is no sweeter friend than a mother.
In the old days, it used to be like this among the Buryats: If suddenly they start talking about their ancestors, They will count on their fingers until the twentieth knee, All grandfathers, great-grandfathers, great-great-grandfathers will be taken into account! N.Damdinov
My Dream House Project
Let everyone to the Alenovsky house sideways bypass adversity. Let the soul sing, It never hurts. And let the light in every house burn like this small candle of Love.
On the topic: methodological developments, presentations and notes
my dream grandmother
Every year in Russia, on the last Sunday of November, Mother's Day is celebrated. What do we value most in a woman? What makes her a woman? Beauty? Charm? Mind? Business qualities? I think that...
Creative project:
"My dream house"

Completed:
student of secondary school №2 Chernukhin Roma
Checked:
technology teacher MOU secondary school №2
Mamadysh -2007
1.Technical details
2. Why I chose this topic
3. Location of the site near the reservoir
4. Site layout
5. House, “Variety of Lines”
6. Building a house
location
foundation
depth of soil freezing by major cities
how to prepare the site for laying the foundation
7. Water supply of the site and sewerage
pipe laying
sewerage
8. List of used literature
Technical details
The purpose of this project was the construction of a country house a. The selected program allows you to work with the technical side of construction, and in the design mode.
Program usedArConHome 2 "Visual Architecture".
The program is shareware, taken from the Internet. The program was created by German programmers, designed for such projects, contains huge libraries of objects and textures. But at the same time, it is easy to understand and can be mastered without consulting specialists.
Description of the used possibilities of the program.
The program allows you to see the final result, identify possible problems (it is easier to prevent them at the initial stage of construction, when designing on paper or on a computer). You can think about the location of the house on the site so that snow can easily fall off the roof in winter, the house is not too close to the road, and the windows of the bedrooms are protected from the morning sun ... In addition, you can calculate the necessary building materials, estimate approximate construction costs.
ArCon Home 2 "Visual Architecture" divides all design into 2 modules: construction mode and design mode.
In the construction mode, the architectural characteristics of the plan are set, all the "building" elements of the apartment or house, which are non-movable, are constructed. On the screen we see a drawing made without volume.
The design mode displays an image on the monitor screen that is identical to the real one (for example, consider the cover of this document). Here you can furnish the apartment, for which many pieces of furniture and accessories are provided.
It is possible to switch from design mode to design mode and vice versa.
In design mode, ArCon uses textures to represent surfaces, for example to show the texture of wood or the pattern of wallpaper. In addition to this texture, each object has a second "skin" characteristic - the material. When choosing a material, its properties are determined, such as, for example, transparency, refraction, reflection, self-luminosity, etc. When viewing already finished parts of the house (rooms or floors), ray tracing is used, which is also used when shooting video clips (accurate calculation of light, taking into account all refractions, reflections, based, respectively, on the property of the material of each of the furnishings). ArCon allows you to view natural and artificial lighting. Artificial lighting is determined by the presence of sources.
The change in natural light over a controlled time can be followed after settings specific to the location of the planned building.
Use of other programs in the project.
Along with the ArCon program, others were used. The photos were edited in Adobe Photoshop 6.0 to create textures.
The sequence of viewing the proposed material, the necessary software and minimum system requirements.
After reading this document, you should watch the videos “Around the house (24 hours)”, “On the first floor” and “The creator's room. Attic". You can open them with the standard Windows Media Player (or other similar player) by clicking the left mouse button (with the CTRL key pressed) on the hyperlinks above or by opening each one in the "Video" folder in order.
1. WHY I CHOOSE THIS THEME
I chose this topic because when I finish school, I will enter a higher educational institution. After graduating, I will be able to find a job and I will have money to build a house with a large garden. It’s beautiful to go outside in the morning, breathe fresh and mind your own business. Children will have fun and not be bored, because I will do everything so that they do not feel sad. The wife will look after the flowers and ensure that we are not hungry.
At school they taught me how to build a house and I will have only small problems during construction. A house far from the city with a large plot, it's not just a house - it's a paradise.
2. LOCATION OF THE PLOT NEAR THE HOUSE
The site, located on the banks of the river, has certain advantages.
1. The view of a river, lake or other body of water will undoubtedly please the eye. Perhaps, none can compare with rest on the shore, especially after hard work at their summer cottage. In leisure time it is nice to swim, sunbathe. In addition, I do not have to spend money and effort on the construction of the pool.
2. A big plus is that if there is no running water on my site, then I will not have problems with watering. By installing a pump with a long hose, you can take water from the river. Plants are best given warm water. And if I take it from a river with a fast current, then water in a barrel or in a tank in the sun. If a lake or a pond is at hand, then such a need disappears.
3. The soil in the area, which is not far from the reservoir, is well moistened. Therefore, the plants grown there are developing perfectly.
But the location of a garden plot near a river, lake, pond and other natural reservoirs, in addition to advantages, also has a number of serious drawbacks.
1. Soils near natural water bodies are often waterlogged and require drainage. To drain swampy or waterlogged places, I dig trenches on the site about 1-1.2 m deep, about 2 m long. I dig deeper ditches on swampy ones and place them closer to each other, directing them with a slight slope beyond the boundary of the garden, or I will lay pipes (collectors) or stones to drain excess water. I will make the trenches open. If the excess moisture is only on the surface, then I will use shallow furrows. I will make them along the beds. Water will go beyond the site, and blind furrows will waterlog the bottom layer of soil.
2. The proximity of the reservoir creates a strong humidity. It contributes to the occurrence of various diseases in plants. Such, for example, as gray rot, powdery mildew, black leg. Therefore, for preventive purposes, I will carry out drainage - the removal of groundwater - or I will plant moisture-loving plants here.
3. Increased air humidity near a reservoir is a favorable environment for mosquitoes and many other insects that can deliver a lot of discomfort to a person. Therefore, I will take all necessary measures to protect myself from annoying insects: I try to wear clothes made of dense fabric, leaving no parts of the body exposed and stock up on a lot of repellents. Dampness is a favorable condition for the development of harmful insects, so you need to regularly treat the plants with special solutions to destroy the pest.
4. Reptiles and amphibians are often found near water bodies. Single mink snakes, lizards in the beds will not cause significant harm to plants. However, bites from vipers and some other reptiles can seriously affect people. But the opinion of the majority about the toxicity of reptiles is greatly exaggerated. If they settled next to me, I will not destroy them, since many of their species are on the verge of extinction and are listed in the Red Book. They themselves will leave my site, as they cannot stand close proximity to a person.
3. PLOT LAYOUT
After I bought a summer cottage, I need to look around, think about what and where I will put. If it is difficult for me to immediately orient myself, then it is best for me to consult with specialists, or at least with experienced gardeners and gardeners. It is very important to plan the site correctly, i.e. Decide what and where I will plant, build.
The condition and development of plants mainly depends on the place of their planting. To do this, I need to take into account favorable and unfavorable conditions in different areas and in their various parts. It is very important to choose a place for a garden, vegetable garden, beds, footpaths, as the growth and health of plants depends on this. If I rationally plan my garden and garden, I will have no problems with the harvest.
When choosing a place for a house, I must necessarily take into account the location of neighboring buildings - at what distance they will be from my house, whether they will interfere in the future. You need to put the house no closer than 7m from another large building and no closer than 8m from outbuildings: pantry, shower, shed and toilet. After everything is decided, I will think about where to place my garden, and where is the garden, that is, where should I plant fruit and berry crops, and where - vegetables.
Under vegetables should be taken with good cultivated soil. To do this, it is necessary to make mineral and organic fertilizers. I enrich with “vitamins”, the soil will reward with a rich harvest.
If my land is new, then in the first years, while the fruit crops have not yet grown, I should plant vegetables between the developing trees in order to prevent the growth of weeds.
When planning, I should not forget about a corner for the soul in my garden, in which I can plant flower plants, install, build a mini -
a pool or a fountain, hang a hammock, put garden furniture and enjoy a comfortable rest after work in the garden and in the garden. Homestead should be first of all cozy and comfortable. I must not only work on it, but also actively rest. A flower garden, a swimming pool, fountains and much more will decorate my “hacienda” and make it almost a piece of paradise.
At the cottage you need to relax from a busy work week. And I can achieve this only if I plan my site correctly. I myself know how difficult it is sometimes to persuade children, especially teenagers, to go to the dacha, because they are so bored and do not know what to do with themselves. I'll leave room for a playground and a pool. This will give them pleasure, and they will go to the country with enthusiasm.
For kids, it would be nice to equip a playground with a sandbox, swings, a hammock and a sports tournament. True, this is only possible if the area is large enough.
Before furrowing and laying the site, I drive in pegs in order to place the site in various zones, I will do this first on paper, and I will immediately see all the advantages and disadvantages of my planning. I can fix something, add something. If I get down to business at once, then it is unlikely that I will avoid mistakes. And if they are taken into account earlier when planning, then I will save both time and building materials.
Only after I have planned everything on paper, I proceed to the delimitation of certain zones on the site. I'm not flattered by the fact that I realized my plan in one year. Don't get discouraged if I don't get it right away. I set myself up for the fact that it was not possible to master the allotment of land so soon, and even more so to build a house.
I start by arming the fence. About what materials are best used for fencing and how to install them, I can read in the chapter “Fence - aesthetically pleasing and practical”.
After the site is fenced, I proceed to lay out the garden and vegetable garden, as well as the construction of various buildings.
For the first time, so that I have somewhere to hide from the weather, I can purchase a prefabricated garden house. It is very convenient and practical. Next year I will make garden paths, a utility block, and take care of the water supply. Of course, it is difficult for me to complete all the listed structures in one year, but gradually my site will begin to look civilized and well-groomed. I am not upset that I will not have time to complete the construction and planting of all crops - haste will not lead to the desired result. Next year I will be able to finish most of it. The main thing is that I do everything in turn, I don’t try to immediately turn my site into a flowering garden and a thriving garden - I’m unlikely to succeed in the first couple of years.
Before laying out a garden and vegetable garden, I can not do without basic tillage. I will transgress to this, as it is right, in early spring, after the snow has melted. First of all, I need to level the surface on the site: fill up and loosen the dug up soil with a pitchfork and rake. But before that, I need to remove the fertile layer. After I leveled the soil, I pour the fertile layer again. Through various trenches, ditches, streams crossing the site, I can build a bridge that will not only decorate the garden, but will create favorable conditions for me to work.
In addition, at this stage of planning, garden and garden paths will begin to be laid. I will pay special attention to the path leading from the entrance to the porch of the house, that is, the central path.
After I have the basic outbuildings ready and the garden and vegetable garden areas are outlined, I will take care of the flower garden and recreation areas. Recreation area i
I'd rather place it on the south side of the site. In order to create a shadow, you can protect it from the sun with pergolas with climbing plants planted near them, equip benches with folding umbrellas or awnings. It will be convenient and pleasant for me to relax if I install a bench near a flower garden or a small pond.
Despite the humidity of the layout of the house, utility rooms, recreation areas, the main concern of every summer resident is the placement of garden crops.
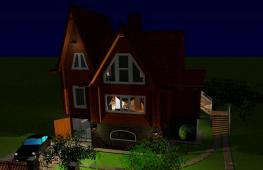
4. HOUSE, ”VARIETY OF LINES”
The contours of this house are matched by clear straight lines and smooth curves. The decorative brickwork contrasts the imitated frames above the window and door openings, the vertical accent of the narrow vaulted window of the stairwell from the plane of the facades.
The framing of the portal passes into the parapet of an elegant staircase, which also forms two large flower beds with arcs rising to the sides. Windows and doors are decorated with intricate floral ornaments.
The kitchen, living room and dining room located on the ground floor form a single space, and on the second floor there is a private one, where there are two comfortable bedrooms, a bathroom equipped in a bay window.
5. HOME CONSTRUCTION
LOCATION
Before I start building a country house, I need to decide where it will stand. I will carefully inspect the plot of land I have allotted in order to figure out where to start laying the foundation. In doing so, I need to take into account several factors:
Place for a vegetable garden. How correctly he is assigned the middle of the site. I do this so that all cultures receive enough light and moisture. If I place a vegetable garden near the house, then the yield will decrease, since nothing can be planted in the immediate vicinity of the building.
Place for a garden. It is better to break the garden around the house, or in the depths of the site.
The house is better located with a facade to the street. But! You can not put a house close to the street. The best option is at a distance of 4-6 meters from the border of the site.
FOUNDATION
The need to build a foundation confronts every builder. It's not easy, given the role she plays. This is the supporting part of any structure, designed to transfer the load of the entire structure to the ground. The service life of the entire building as a whole, its strength and durability depend on how well I built the foundation. It was estimated that the cost of the foundation is about 15% of the total cost of a country house. So I did some reading and thought about whether it is worth buying low-quality and cheap construction materials for the foundation and whether it is worth building it carelessly, so that later you suffer from your savings. I remember the wise proverb “the miser pays twice”. After all, in the end, everything will affect the state of my house.
Before I start laying the foundation, I need to take into account the type of soil and, based on this, I decided which type would suit me best. I distinguish mainly two kinds of foundation: artificial and natural. Natural I do without any fortifications when the soil favors it. Artificial, I always strengthen something, for example, with sand. It is believed that the most reliable foundation is a homogeneous soil, which is characterized by good and quite decent stability. In addition to one soil, there are:
1. Rocky soil - it is characterized by reliability and relative strength. In addition, it is not exposed to precipitation, and I can not be afraid that it will get wet or cold.
2. Cartilaginous soil (gravel, stone fragments, cartilage) is different in that it will not shrink and will never get wet. As it is correct, I will lay the foundation in such soil at a depth of 50-60 cm.
3. Sandy soil - due to the fact that sand is an integral part of this soil, it has good water permeability. It usually doesn't freeze. In this case, I will lay the foundation to a depth of 50 to 70 cm.
4. Clay soil has good compressibility, but erodes quickly. When freezing, there is a danger that it may swell. At the same time, I lay it to a considerable depth (70-80 cm).
As a rule, I lay the foundation to a depth just below the freezing depth.
SOIL FREEZING DEPTH
BY MAIN CITIES
100 cm - Rostov-on-Don, Astrakhan, Kyiv, Minsk.
120 cm - Volgograd, Pskov, Velikiye Luki, Kharkov, Smolensk.
140 cm - Moscow, St. Petersburg, Voronezh, Novgorod.
150 cm - Saratov, Vologda, Nizhny Novgorod, Penza, Kostroma.
170 cm - Kazan, Simbirsk, Samara, Izhevsk.
I take into account that the laying of the foundation and the subsequent construction should be carried out in one building season. I need to take this mandatory condition into account so that the foundation, which was laid, but did not receive superstructures in the form of walls, covers and roofs, does not deform. As a rule, it will be very difficult for me to correct this oversight in the future. A similar nuisance can also occur if the house was successfully built based on a heated regime, but did not receive the operation that was required. But, as a rule, country houses stand without the expectation that they will be used in winter, so the heating mode is not included in the construction plan, hence I should not have any special fears that the foundation will deform.
HOW TO PREPARE THE SITE FOR
LAYING THE FOUNDATION
Before I start laying the foundation, I need to clean the selected place from the grass to about a depth of 10-15 cm. The site should be flat, so I will have to tear down all the small hills and fill in the holes or pits. After the site is ready, I need to place the boundaries of the foundation. To do this, I use a cord and a large square. I carefully measure the length and width of the foundation with a square and a cord, drive a peg into each corner.
After that, I need to fix the boundaries of the foundation. To do this, at a distance of a meter from the edge of the future trench along the outer perimeter of the foundation, I break in wooden poles or trimmings of metal pipes so that they are in height
reached 20 cm. Then, on these posts, I strengthen the fishing line (or cord), which is stretched so as to mark the rectangle of the foundation.
As soon as I marked out a place for the foundation and fixed its boundaries, I start working on the ground. To do this, I dig a trench along the perimeter of the borders and install a wooden shield with spacers in it - a formwork that prevents the earth from drying out. If I do not use formwork, then in order for the earth not to crumble and dry out, I lay the foundation immediately after excavation.
If water gets into the dug trench, I need to remove the liquefied soil. I do this just before I start laying the foundation.
6. WATER SUPPLY OF THE SITE
AND SEWER
WATER METER
A water meter is a small well (mine) 90x100 cm in size, 120 cm deep, which, when connected to a water supply system, allows you to control the flow of water into the house. It has a pipe running from the main water supply.
As it is right, I carry out the plumbing after the house is built. The construction of the water meter is the responsibility of the plumber who makes the connection to the main line. I use a water meter when repairing a water pipe, when it is necessary to stop the water.
The water meter shaft is installed from concrete. The shaft itself must be designed so that water does not flow into it and it would be protected from temperature fluctuations. In the side wall, I will make rebar brackets that I can use as a ladder.
The pipe passing through the water meter has two valves. One of them is called a stopcock and serves to turn off the flow of water from the main water supply. The other is called the internal plumbing gate and serves to disconnect the house from the water supply. Between the valves is the water meter itself, with which you can drain the water.
PIPE LAYING
I lay pipes in trenches located below the freezing level of the soil. In this case, it is desirable that the pipes with hot and cold water be located one above the other at a distance of 16 cm, and the pipe with hot water would be from the top. The same can be said about laying pipes indoors. They are held one above the other, on top - a pipe with hot water. When laying along the wall, it should be located below the cold water pipe. Every two meters I need to fasten them with holders.
For internal plumbing, I use threaded steel pipes and fittings (shaped pipes): elbows, bends, etc. Pipes can be of different diameters. It is determined in accordance with the amount of water consumed, as a rule, a diameter of 25 mm is more convenient for a single-family water pipe. Depending on what kind of water analysis will be from one or another line, I choose the diameter of other pipes. For example, for 7 taps - 25 mm, for 3 - 6 taps - 19 mm, for 1 - 2 taps - 12.5 mm.
I will supply the risers and branch pipes of the internal water supply with shut-off valves. This is necessary so that in case of damage to the draw-off point,
depressurization of the connection and in other situations, I could turn off the water without shutting off the shut-off valve in the water meter.
SEWER
It is best if the holiday village already has a sewer network, to which I can connect by arranging a house outlet, which must have a slope of at least 2% in order to drain wastewater.
The pipes must have a diameter of 30 cm (with appropriate figures). For nothing more suitable is a U-shaped gutter made of bricks, which I will sprinkle with sand.
For the device of internal sewerage, I accept pipes of various diameters: from 40 to 100 mm. It connects to ventilation ducts that have an exit above the roofs. I need this in order to not create a vacuum of air that would interfere with the outflow of water. All plumbing must have siphons that prevent the penetration of an unpleasant odor.
However, not all villages have a sewerage network, which creates various problems for wastewater disposal. I solve them in the following way.
The removal of “clean” and fecal waters is carried out separately. The “clean” ones pass through two wells, in which the water settles for some time, foreign impurities settle to the bottom of the well, and the water goes further, where it is distributed over the land by drainage pipes (located underground). “Clean” water refers to the one that flows from the washbasin, bath, sink. Settling tanks are cleaned from time to time, and the first one has to be cleaned much more often. If there is a well on the site, then the sedimentation tanks should be located no closer than 20 m from it. In addition, I place them in the direction opposite to the flow of groundwater.
7. CONCLUSION
And in conclusion of the topic, I would like to say about where you would like to live: in an apartment where neighbors often interfere, go down an untidy entrance or live on the ground, breathe fresh air, where no one interferes with anyone. Think for yourself.


 Back forward
Attention! The slide preview is for informational purposes only and may not represent the full extent of the presentation. If you are interested in this work, please download the full version.

Brief description of the object
One-story house, designed for a family of 3-4 people. The house has a spacious living room with a fireplace, a kitchen-dining room and three bedrooms.
Technological process during operation: temperature humid conditions (t- up to -5 ° С, humidity 70-80%), thermal insulation (up to 3.5 m2 0С / W), airborne noise insulation index is 50-60 decibels, pH level is about 11-12.
Technical and economic indicators:
- Building area (sq.m.) - 154.3
- Total area of the house (sq.m.) -233
- Building volume (cubic meters) - 563
Estimated cost of building a residential building
- For finishing - 2,457,481 (16,832 rubles per sq.m.)
- Box - 1,776,450 (12,168 rubles per sq.m.)
Material consumption:
- Concrete - 47 cubic meters.
- Cement - 8.5 tons
- Sand - 35 cubic meters.
- Fittings - 2 tons
- Chamotte clay - 40 kg.
- Timber brought to the roundwood - 26 cubic meters.
- Blocks Durisol DSs 37.5 / 14 - 707 pcs.
- Blocks DurisolDm 15/9 - 553 pcs.
Materials for building a house:
- Foundations - prefabricated reinforced concrete
- External walls - Durisol blocks
- Ceilings - Durisol blocks
- Roofing - metal tiles, soft roofing tiles
- Exterior finish - plaster
- Plinth - natural stone
Engineering equipment: power supply from settlement electrical networks; gas supply from the settlement gas pipeline; water supply from the village water supply; sewerage cesspool device; heating hot water supply from the boiler; radio communication from the village radio station.
house plan


Technology of building a house from DURISOL blocks
I envision my dream home built from modern Durisol woodchip and cement blocks designed for monolithic construction without the use of mortars or adhesives. In my opinion, the Durisol building system perfectly combines time-tested natural building materials like wood and stone into a new modern form. I believe that these blocks are ideal for our area in terms of their properties:
- fireproof: Durisol blocks comply with fire safety requirements, being a low-combustible (G1 group), hardly flammable (B1 group) building material with low smoke-generating ability (D1 group), non-propagating flame (P1 group), low toxicity (T1 group).
- Resistant to mold and mildew: the material has highly alkaline characteristics (pH level around 11-12), which, along with the property of the material not to absorb moisture, prevents the growth of mold and the development of fungi.
- Weather resistant: the material is frost-resistant and withstands sudden temperature changes (more than 300 cycles), practically does not absorb moisture, which allows you to store blocks in the open air and perform construction work in winter (at temperatures up to -5 ° C, concrete with additives).
- Functional: a range of block configurations (row, corner, end, universal) for partitions, external and internal walls with different bearing capacity makes it possible to create a variety of architectural forms and building layouts.
- Easy to handle: the material is easy to cut, nail, drill and mill for laying engineering communications channels in the walls or giving the necessary architectural configuration. The porous structure facilitates finishing with plaster compositions.
- Ecologically pure: produced on the basis of natural materials - wood and stone, does not emit harmful substances, does not pollute the environment and is 100% recyclable.
- heat-saving: the design of blocks with polystyrene foam inserts for external walls prevents the formation of cold bridges and creates high thermal insulation (up to 3.5 m2 0C / W) of the concrete mass inside the wall, which accumulates heat and gives it back to the room after the heating is turned off. Provides a reduction in heat losses and savings in energy consumption. With high heat-saving characteristics, the wall made of Durisol blocks has a small thickness (max. 375 mm), which increases the usable area inside the room.
- soundproof: the structure of the wall material provides high sound insulation of the interior of the building (airborne sound insulation index is 50-60 decibels). This property, along with the resistance of the material to atmospheric influences, is also used for the construction of noise protection structures along highways and railways.
- Breathable: the porous structure and construction of the blocks provide a natural circulation of water vapor through the walls, a balanced ratio of temperature and air humidity is established, which are the determining elements of the internal climate.
Preparatory work for masonry

Preparation of materials for stone work
- Sort Blocks
- Prepare masonry mortar
- excellent thermal insulation (heat transfer resistance up to R=3.52 m2 - C/W) and heat accumulation;
- high sound insulation (up to Rw = 60 dB):
- minimal vapor diffusion resistance: Durisol walls “breathe” perfectly, which provides a comfortable microclimate;
- high fire safety (corresponds to groups G1 - low combustible, B1 - hardly flammable, D1 - with low smoke-generating ability, fire resistance of the wall under load> 150 min);
- weather resistance, minimum level of moisture absorption, which allows the material to be stored on open construction sites and is also suitable for construction sites that do not require plaster;
- ease of use: the material is easy to cut, drill, nail, all construction work can be done independently;
- low labor intensity of work, which allows construction in a short time at low costs.
Modern technology of monolithic construction of buildings and cottages based on non-removable environmentally friendly formwork DURISOL.
DURISOL is a unique combination of consumer properties technology for building houses. It is based only on natural components: wood and stone. DURISOL is made from 80-90% softwood chips treated with mineral additives and bonded with Portland cement. It is an eco-friendly, lightweight, strong and durable material. It has excellent heat and sound insulation characteristics, a high degree of fire safety, is not subject to rotting, fungus and mold damage, and is frost-resistant.
The construction technology of DURISOL is based on the production and use of fixed formwork wall blocks of standard form: 50 cm long, 25 cm high, and 15, 22, 25, 30 and 37.5 cm thick (depending on the functional purpose). Typical series contain blocks for the construction of load-bearing walls and interior partitions and blocks with insulating inserts for external walls with high heat-saving properties. The series also includes blocks for forming rows, corners and openings.
The installation process of walls made of DURISOL building blocks is simple and effective: they are stacked on top of each other in four rows, after which the cavities in the blocks are filled with concrete. Then the next four rows are installed, etc. As a result, a monolithic concrete lattice is formed inside the wooden wall with powerful vertical load-bearing pillars and horizontal row jumpers. Thanks to the macroporous structure of the material and the grid cells, the wall “breathes”, and a comfortable microclimate is created in the rooms built using DURISOL technology.

Installation does not require the use of highly skilled labor and heavy lifting equipment (the weight of one block is 6-15 kg). DURISOL has increased adhesion to plaster compositions, which simplifies the process of wall finishing and, together, leads to a significant reduction in labor intensity, terms of work and cost of the finished structure compared to traditional technologies.
DURISOL blocks are used for monolithic construction of residential (individual and multi-apartment) buildings, as well as administrative, public and industrial buildings.
Used Books.
- A.M.Gorbov. Modern renovation of apartments and houses. 2006
- Magazines: "Rural construction" for 2007-2010
- I.I. Chicherin. General construction works Textbook M.: 2004.
- I.P. Zhuravlev. Mason. Textbook for students of PU and lyceums.
- O.N. Kulikova, E.I. Rolen. Labor protection in construction. Textbook. M.: 2006
- CH and P 12-03-99. Occupational safety in construction 4.1., general requirements.
- Yu.O.Polekaeva. Construction drawing. Textbook. M.: 2004
- GOST 25192-82 "Concrete and general technical requirements"
- GOST 7473-94 “Concrete mixes and specifications”.
State educational institution
"Artyomovskaya specialized school No. 8"
PROJECT THEME
"My dream house"
PROJECT COMPLETED
6th grade students
PROJECT MANAGER
Borovik Galina Sergeevna
Artemovsk 2016

THEORETICAL PART
RATIONALE FOR CHOOSING A TOPIC
Each boy is the future head of the family and the owner of the house, therefore, already in childhood, schoolchildren must be introduced to the structure of the constructed dwelling and instilled with the skills of an economic attitude to its improvement. Some of them will choose a profession in the field of construction, having received primary ideas about this already at school. This presentation is a student project on building a house, from planning to layout.

THEORETICAL PART
OBJECTIVE OF THE PROJECT:
Learn how to do layout projects
houses on a scale, a dream come true for building
houses in miniature
Project objectives:
Evaluate all the advantages and disadvantages of the building
houses at the initial stage of project development

THEORETICAL PART
PRODUCT SELECTION, STAR OF CONSIDERATION
PRICE
MATERIALS
COLOR
TECHNOLOGIES
EQUIPMENT
SOMETHING OWN
USAGE

THEORETICAL PART
CRITERIA TO BE SATISFIED BY THE PRODUCT
1 . Building style
2. Functionality
3. Dimensions and useful area
4. Architecture and layout

THEORETICAL PART
EVALUATION BY CRITERIA
2.Functionality
3.Dimensions
4.Architecture
2.Functionality
3.Dimensions
4.Architecture
2.Functionality
3.Dimensions
4.Architecture
2.Functionality
3.Dimensions
4.Architecture
CONCLUSION: The students chose the product from photo No. 4, because. the house meets all the evaluation criteria

THEORETICAL PART
- The problem with housing in our city is always relevant. Few new houses are being built, and the old ones are gradually failing.
- One way to solve this problem is the construction of private houses.
- This project is a 2-storey residential building with an attic.
- It can be located both in the city and in the countryside.

THEORETICAL PART
PROJECT RESEARCH - INFORMATION ANALYSIS

PRACTICAL PART
SELECTION OF MATERIALS

PRACTICAL PART
CHOICE OF EQUIPMENT, TOOLS, DEVICES
- Cardboard boxes, cardboard;
- Scissors
- Stationery knife
- Ruler, pencil

PRACTICAL PART
Sequence of operations
Drawing up a sketch.
Type of work
Each student in the class drew their own sketch. Some turned to other sources (books, the Internet) and made sketches from them. After a general discussion, the main layout of the house was chosen.
Material selection
Distribution of duties
The students brought the necessary materials to make the model.
Each student chose his own layout detail and material for manufacturing.

PRACTICAL PART
TECHNOLOGICAL SEQUENCE
Sequence of operations
Type of work
Layout making and design
Making a model of a house from cardboard
- On cardboard boxes, draw and cut out the details of the house at a scale of 1:50
- Glue the walls, form the house and glue it to the cardboard base
- Cut and decorate windows and doors
- Cut and glue the roof to the house
- Decorate the space around the house, glue paths and flower beds

ECONOMIC PART
PRODUCT COST CALCULATION
Unit price
Cardboard boxes (waste material)
Printed sheets of paper with imitation of bricks
Quantity
Colored paper, glue
Price

ECONOMIC PART
- Making a layout in a full-color version (self-adhesive color film with full-color printing) using plastic, plexiglass, cardboard, wood and with a simplified study of the elements of the object will cost the client from 500 USD. e. Production time is about a week.
- In our case, the cost was 50 rubles

ENVIRONMENTAL RATIONALE
The project is made of environmentally friendly materials that do not emit chemicals and do not pollute the environment. These products evoke beauty, joy and admiration of people.


PHOTOS
PRODUCT MANUFACTURE

PHOTOS
READY PRODUCT