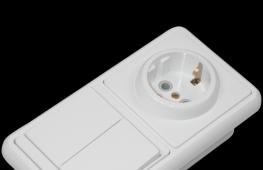
How to install a three-piece socket block. Selection and installation of the block of sockets. Niche or hole preparation
We have examined how a 220 volt outlet is connected. The turn of the story about the installation of a block of several devices has come.
Important! Modern modular blocks often include not only power sockets, but also computer and telephone ones.
Safety
Before starting work on installing the unit (and any other work related to electrical installation devices), it is imperative to turn off the machine in the electrical panel to which this unit will be connected. After turning off the desired machine with an indicator screwdriver, you must make sure that there is no voltage. In the residential premises of the old building, where the machines are not installed, it is required to unscrew the plugs.
Connecting the block socket + switch
The "regular" place of installation of such a modular product is in the corridor on the partition separating the bathroom and the bathroom. On one panel are the switches for lighting fixtures in these rooms and a socket for electrical appliances that are constantly used in the bathroom. It is dangerous to use a product without moisture protection in the bathroom, so blocks without moisture protection are mounted in the corridor.
To connect a block with a two-gang lighting switch in the bathroom and in the bathroom, five wires from the junction box must be laid to it.
- The ground conductor in the diagram is shown in light green, zero is blue. These two conductors go directly from the junction box to the outlet.
- The phase is marked in red. This conductor is connected to the outlet, then with a jumper - to the common contact of the incoming phase of the switch.
- The remaining two wires are connected to two switched contacts. Through them, the phase is connected to the lighting fixtures when the keys are pressed. These are the lamps in the bathroom and the bathroom. Such a scheme provides a constant phase, zero and ground at the outlet, and a phase at the bottom contact of the switch keys (zero goes to the lighting device). On the upper contact, the phase appears when the keys are pressed.
Two twists of wires are made in the junction box. In the diagram, they are indicated in beige and yellow. The switched phases are twisted from the switch to the phase conductors outgoing to the lamps. Zero and ground conductor are taken in the switch box from the contacts to which the socket in the block is connected.
Important! To change the order of operation of the keys, you need to swap the beige and yellow wires on the switch.

If it is planned to install a single-gang switch, the beige or yellow conductors must be excluded from the circuit.

The use of a three-key product requires the use of a 6-core cable. The sixth core of the cable is connected to the third switched contact from above, together with the beige and yellow conductors.


Connection
If it is necessary to use a significant number of electrical appliances, a computer and a telephone, modular products are installed. The peculiarity of their installation is that all connections in them are made in parallel.
Usually they are installed in the living room or in the kitchen. In the living room, they are traditionally hidden behind the TV; for the kitchen, very interesting solutions have recently appeared with products recessed into furniture or countertops. Such models, hiding in the table, can also be used in other rooms of the apartment.


How to connect sockets in a modular product?
Consider the scheme of work on the example of a block of three elements.


First, jumpers of not very long length are made from three wires and inserted into each socket (in each seat), so that in the future they do not interfere with the installation.
Then you should disassemble all the installation devices. The wires or cable coming from the junction box are stripped. The jumpers between the mounting boxes are also cleaned.
Advice! It is better to leave a small supply of cable coming from the junction box when stripping. In the future, you will have the opportunity to strip the wires again and make a new connection.
The first device is connected as a conventional 220 volt wiring device. The device itself is installed in the mounting box according to the level. Wires of the same color are connected in parallel. Then the second device is installed. Three wires are connected to the third. The reliability of the installation of all devices is checked, a common bar and front panels are mounted.
For convenient placement of household appliances and lighting fixtures, an outlet block is often used. It has 2 to 5 power points. Installing the kit is not difficult if the master has the skills. Even a beginner can cope with the work.
The design of the socket block
Socket block with 5 points
A complete kit for mounting power points has the following design:
- a set of sockets;
- the polymer panel itself with 2-4 sockets located on it.
The dimensions of one are 72x72 mm. Respectively:
- two points in a row - 142 mm;
- three - 212 mm;
- four - 284 mm.
Knowing these parameters is necessary in order to correctly determine the installation point of the socket block (distance from a wall or window). Most often it is placed in such places:
- Kitchen. As a rule, power points are installed above the work surface at least 40 cm from the sink.
- Living room. So that the sockets are not visible, they can be removed behind the cabinet with the TV or under the bar counter.
- Bathroom. Here the whole structure can be placed behind the built-in wardrobe. Thus, the power points will be hidden from the eyes and moisture by the doors of the furniture.
It is advisable to raise sockets from the floor to a level of 60 cm and above.
Connection methods

Combined way to connect sockets
There are two ways to connect power points to the power cable:
- daisy chain. It implies powering each outlet from one line. The advantage of this method is the minimal complexity of the process. Minus - the failure of all power points, subject to the slightest damage to the cable at least in one of them. The maximum load for a daisy-chained unit is 16 A.
- Combined. A newer way to connect multiple sockets at the same time. It implies the laying of two cables at once from the junction box. The first type of loop feeds three of the four outlets. The second is intended for 4 power points and can serve more powerful equipment (stove). The main advantage of such a connection is that the rest of the sockets of the block are insured against failure in case of problems with “strong” equipment and power points for it. Of the minuses of the master, the laboriousness of the process and the double consumption of the electric cable are distinguished.
Both types of connection can be laid in a closed (in gates) and open (in PE channels) way. The latter option is additionally protected from mechanical impact by cable channels or a plinth with internal grooves.
Preparing for installation

Preparing tools for mounting sockets
In order for each block socket to be installed correctly, you need to prepare the following materials:
- panel with the required number of power points;
- decorative bar;
- wiring cable with the required footage - measured from the junction box along all vertical and horizontal strobes to the point where the structure is located;
- jumper wire;
- alabaster or gypsum (you can putty).
From the tools you need to prepare:
- building level or ruler;
- pencil;
- perforator with a crown for concrete and drywall with a diameter of 70 mm;
- chisel, hammer;
- electrical installation tools;
- putty knife;
- container for mixing putty (gypsum, alabaster).
Noisy work is desirable to perform on a weekday from 10:00 to 17:00, when most of the neighbors are away from home.
Do-it-yourself installation of the socket block
All actions for installing a group of power points are performed in strict sequence.
Wall marking
Performed using a building level or a ruler with a marker. Future channels should be located only vertically or only horizontally. It is forbidden to make oblique strobes for cable laying. It is important to accurately mark the places for the installation of socket boxes. There must be strictly 72 cm between their central parts. Otherwise, the boxes will not fit into place.
Shtroblenie

Shtrobleniye of walls under sockets
The preparation of channels for laying the cable can be done with a perforator, grinder, chisel with a hammer. Each master selects a method for himself, depending on the availability of one or another tool.
The principle of forming a strobe looks like this:
- Along the marking line, the grinder makes a cut on both sides. If the master works with a puncher, holes are made along the line in steps of 1.5-2 centimeters.
- With the help of a hammer and chisel, excess concrete is knocked out of the wall, forming channels for laying the wiring.
- Technical recesses for the installation of socket boxes are made with a puncher with a crown. Concrete is also cut here, and then the excess is knocked out with a chisel and hammer. If necessary, select the depth of the excavation. The socket box is periodically inserted into the concrete, checking how far its edges protrude above the plane of the wall. The norm is considered to be some deepening of the elements inside. Later, the excess free space will be filled with building mixture.
When carrying out dirty work, it is advisable to use a respirator to protect the respiratory tract from construction dust. The use of safety glasses is also important.
Installation of socket boxes

Built-in sockets must be flush with the wall
To install a set of socket boxes, it is advisable to buy special plastic cups for them. Elements are fixed in nests with alabaster or gypsum mortar. It is prepared from bulk material, mixed with water in a ratio of 4:1. The consistency should look like thick sour cream.
The finished solution is laid in the nest of the concrete wall and, having released wires into the technical gaps of the glasses, they are mounted in the wall. It is important to monitor the evenness of the installation of glasses using a level. It is unacceptable if they protrude above the plane of the wall. With the help of the remnants of the building mixture, the wall around the future block is leveled as much as possible.
The solution sets in about 2-4 hours. To be sure, you can give him a day to dry.
Features of installing socket blocks in drywall

Installation of sockets in drywall requires accuracy
If the overhead socket box needs to be built into a drywall wall, less labor can be applied here. The socket block has special paws that you just need to press against the GCR box on the sides. In turn, the outer ledge-rim of the glass simply will not allow it to fall inward. If in the future it is planned to clad the wall with tiles, it is necessary that the element protrude above the plane of the wall by the thickness of the facing material.
At the time of the formation of a nest for glasses, it is advisable not to press hard on the wall so as not to break it. Drywall is a relatively fragile material.
If there is not enough space between the wall and the drywall slab, you will have to carefully deepen the concrete or brickwork at the location of the block.
Electrical connection

Before starting electrical work - check the voltage on the wires in the socket using the indicator
After the solution dries, proceed to connect the cable to the sockets. With the loop method, they act like this:
- The cable mounted from the junction box is led into the first socket. Its braid must first be cleaned with a knife or side cutter by 10-15 cm in order to free the internal wires. It is advisable to leave a small margin for possible repairs in the future.
- Use pre-prepared multi-colored jumper wires. Their cross section must be the same as that of the supply cable. You don't need to make the jumpers very long. They will prevent the block from "sit down" tightly in the nests. On the jumpers, you need to remove the braid by 1 cm.
- Pass all the wires through the technical connectors-holes in the sockets.
- The upper protective cover is removed from the typesetting block and the clamping screws are unscrewed by 5-6 mm. The first conductor is connected to 1 socket, taking into account the position of the terminals. Already from it, with the help of contacts, the PE conductor and all zero cables are diverted to the rest of the sockets.
- All nests with arranged wiring are carefully attracted with fixing screws without effort. The master must remember that the power line connections must remain non-separable.
- All bare sections of wires are wrapped with insulating tape.
- It remains to insert the socket with the wires connected into the glasses and fix it using the side clamps.
- The level controls the evenness of the placement of the block.
- Lastly, mount the upper part of the kit.
At the time of daisy chaining, it is important to keep track of the polarity of the contacts. The same cable is taken from the zero terminal. From the phase conductor - phase.
A fully assembled and installed wall unit should “sit” firmly, resist attempts to move it by hand.
For many owners of houses and apartments, installing and connecting sockets seems to be something complicated, which simply must be done exclusively by a master. In truth, this is not the case, and therefore this article will tell you how to make a do-it-yourself installation of an outlet block.
What you need to know before you get started
Nowadays, there are a huge variety of materials from which a wall can be made. There are plasterboard walls, stone walls, brick walls, concrete walls. Different installation technologies are used for them, since each of them has its own specifics.

Note
This article only describes how to install and connect the socket block, despite the fact that today we also have such a combination as a socket with a switch, but an article will be published about it some other time.

To install sockets, you need to know the dimensions of the socket blocks, and they are as follows:
- The size of one outlet is 72 millimeters wide and the same in height;
- The block size grid of 2 electrical points is 72 mm long and 142 mm wide;
- The block size grid of 3 electrical points is also 72 mm long and 212 mm wide;
- The grid of 4 parts is 284 mm wide and 72 mm high.
Safety during socket installation
The process of installing and connecting the outlet must be safe and fairly aesthetic. Let's talk about the first, professionals recommend installing sockets at a height of about forty centimeters from the floor, although most people install them at a height of about a meter.

Children should not have any access to sockets, so it is worth installing sockets with a protective cover that a small child will certainly not be able to break into.

detailed instructions
In order to simplify this work as much as possible, this article contains step-by-step instructions for mounting the socket block.
Prepare for installation
Before you start work, it is worth determining the place where you will place the outlet group. If this place is the kitchen, then the outlet should be placed just above the countertop, thereby ensuring that the cord from any kitchen equipment will successfully reach the outlet.

In case you plan to place sockets in the living room, it is best to do this behind the TV, which will hide all the wires.

Speaking about the bathroom, it must be taken into account that the sockets must be located at least 0.6 meters from the bathroom and be waterproof.

Wall marking process
A critical stage that determines the quality of the installation of sockets and their connection. In order to implement it, it is necessary to lay sockets on the place where the sockets are installed, the number of sockets laid on depends on how many sockets will be present in the block.

When doing this work, be aware that there should be exactly 72 centimeters between the central parts of the sockets. By making a mistake in measurements, you guarantee yourself that the outlet cover will not fit.


Gating
This process is not as difficult as it sounds. It includes the creation of sockets for socket boxes. In this case, you need to have a puncher with the right nozzle.

If you are going to place the socket block in a concrete or brick wall, then it is vital for you to gouge the circles with a crown, and then knock out the core with a chisel.
Installation of socket boxes
It is also not the most difficult step in installing sockets, since today the market offers plastic cups created for this procedure that connect to each other. So even the most recent layman can handle it.
If the installation of socket boxes takes place in a concrete or brick building, then you need to cover the glasses with a plaster solution.

If you are dealing with drywall, then know that the implementation of the above procedure at sub-sockets is simple, since they have paws created for this, which are pressed against the sheet on the sides.


Electrical connection
After waiting for the substance to harden, you need to start turning on the indoor socket block to the 220V network. Several euro sockets can be connected to one electrical wiring line at once, but keep in mind that this is only done when you know that you will not connect, say, an electric stove.

And now to the point, to install and connect the socket blocks, you need to bring the lead wires coming from the junction box into the very first socket box: phase, zero and ground. Next, in order to connect other outlets, make jumpers.

Note
The above procedure is carried out with the electricity turned off in the apartment or house.

Having completed the work on connecting all the cores and terminals, you can install the socket covers yourself and compare the externally obtained result with the photo of the socket blocks below.


You don't have to be an electrician to understand the process of installing sockets and switches. You need to know the simple rules and stages of work formulated in this article.
Important to know before starting work
Security conditions
It is important to do all the work on installing sockets and switches, laying electrical communications only after a complete shutdown of the current in the network. Turn off the machine or traffic jams. And do not connect until the installation work is completed.
Take the indicator and make sure that the outlet or wiring you are going to work with is de-energized. Professionals suggest using two indicators at once. This will ensure that undesirable consequences are avoided.
Points to consider
- You should monitor the condition of the wire insulation, and do not use damaged copies in your work.
- It is strictly forbidden to cut live wires with wire cutters.
- In places where wiring has already been laid, it is impossible to engage in chiselling, drilling or cutting them.
Any touch with a screwdriver with zero and phase wires inevitably provokes a short circuit in the network.
Socket Installation Standards:
- not lower than 20 cm from the floor;
- for every 6-10 sq. m. housing rooms is made one outlet.
Rules for mounting sockets and switches
In order for the installed system to serve for a long time, it is important to choose the right wires and cables to be connected, and lay them properly.
For this, you should take into account:
- The power of all future energy-consuming appliances in an apartment or house. All devices are simply added together. It is necessary to know and what is the maximum power allocated by the network.
- The choice of the type of wire or cable depends on the method of laying them: open or internal. It is necessary to decide which gasket is suitable for a particular electrical installation site.
- When laying wiring, do not lay wires in bundles.
Important! Do-it-yourself installation of an electrical outlet, wiring and further installation of lighting is possible provided that a switchboard has already been installed and configured by a professional (electrician) at the facility or in the apartment. It is not recommended to collect it yourself, without having a special education - it is life-threatening.
Wall outlet installation
What you need:
- socket
- electrical wires (it is worth choosing with a cross section of at least 2 sq. mm.)
- socket box
So, after choosing a place for the outlet and turning off the current, we proceed directly to the installation:
- We place a distance from the floor of 30–100 cm. We mark the installation site with a pencil. We consider the distance from the switchboard to the designated place and determine how many meters of wiring are needed.
- We install a special nozzle for drilling holes in the drill chuck, corresponding to the type of wall and working with electrical fittings.
Tip: when there is no special nozzle, and a single installation of the device is planned, use the following method: according to the marked sketch of the socket (more precisely, the socket), holes are drilled directly on the wall, and the socket is knocked out with a chisel and a hammer.
- Turn on the drill, if necessary, take an extension cord that is suitable in power for the electric drill you are using.
- Put on protection (goggles and, if possible, a respirator) and drill the required hole in the wall.
- Make a groove for the electrical wire. Use a grinder with an appropriate disc or gouge the groove with a chisel and hammer.
- Then the socket box (through which the wiring is pulled out) is installed and fixed in the finished hole.
Tip: measure the wiring with a margin, as the short length complicates the process of connecting to the outlet. And if in the future there is a need to replace the item, then the stock will facilitate the work. Moreover, the wires sometimes burn out and, having a margin, the old ones are simply cut off. Without a stock, replacing an outlet is much more complicated.
- The wire laid in the groove and all the chips and recesses in the socket area are covered with gypsum (alabaster). We wait until complete drying.
The first part of the work has been completed.
Connection
Open the junction box. Then, using the terminal clamps, the electrical wire is connected.
Modern methods of connecting wires using terminals and terminal blocks:
Connection methods using terminals

Important: the thicker the IPZH, the more the cable costs. But don't skimp on wiring. A weak (cheap) wire can burn out, and it will take an impressive amount and a lot of effort to replace it.
- Remove the cover from the outlet. Loosen or unscrew the screws that will clamp the wires. Insert the ends of the wire (after stripping them) and tighten them firmly with screws.
- The screws of the installed legs are loosened and reduced to the body of the socket, which is inserted, and fastened (in the process of tightening the screws) into the socket. The paws, spreading out to the sides, are fixed to the socket and hold the structure in the wall.
- It is recommended to make sure that all wiring is connected.
Turn on the power and test the operation.
Types of sockets and socket boxes and rules for their installation
Along with standard power outlets and switches, new items and variations of these items have appeared on the market, significantly different from their predecessors. But the basic principle of their performance has not changed.
Sockets
Each device consists of:
- contacts;
- bases (pads);
- protective case.
Contact - a key element through which current is transmitted from the cable to the contacts of the connected device.
Three wires are made in sockets: phase, zero and ground. In the old ones there are only two - phase and zero.

Socket block - the base on which the contacts and the protective case are held. When the socket is built-in, there are fasteners on the block for its installation in the socket.
Housing - outer cover with plug holes.
Two types of devices:
- outdoor;
- Internal (in the wall).
The connection process is the same. The only difference is how they are mounted on the wall. For devices for closed wiring, they take a special box where the socket itself is inserted.

Sockets and their installation
These items are divided into two types:
- The first - under the plaster. A hole is drilled either in concrete or brick. In this mounting hole, a socket is installed on plaster, or on alabaster.
- If there is any wall cladding, that is, drywall, or MDF panels, or plastic, and so on, undercuts built-in under the plasterboard are used. The diameter of the drilled holes is 68 mm.
Also, for a certain line of electrical fittings (sockets, switches), special undercuts supplied directly by the manufacturer of fittings are used. For example, the ANAM company - specialized undercuts.
outdoor socket
It is used in the open method of laying electrical wires. Especially when wood trim is used indoors, it is the outdoor unit that is safer. The openness of the wires makes it possible to quickly find possible problems and prevent a fire. The socket itself is simply screwed to the wall.
If mounting on a tree, then:
- be sure to use a special gasket made of paronite between the device and the material;
- then fixing the wiring to the terminals and applying a decorative cover to the base of the device.
Assembly is ready.
Internal socket
The installation process is a little different. For fixing, you need a special box to install the device in it. It is inserted into a hole in the wall and fastened with screws.
When the wall is drywall, then:
- choose special boxes with ears.
Boxes can be metal (old version) and plastic (modern standards). Their diameter may vary. When choosing, consider this point, since modern sockets are most often sold under plastic.
- Unscrew the cover from the socket and install it in the box.
- Fasten the device with screws of the spacer legs.
- Connect wires.
- The design is closed with a decorative overlay.
Important! Fixing the screws should be done diligently. If the contact is weak during use, the socket will heat up.
Then turn on the electricity and check the device.
Replacing the built-in socket
If it is necessary to replace the element, the old socket is first dismantled.
Dismantling

Installation
After completing all the dismantling points, the installation of a new outlet begins.
First action. The wires that were removed earlier are reduced to the required length. It is from 15 to 20 cm. Then one and a half cm are cleared of insulation.

Second act. Wires should be connected to the device.

Third. The wires are bent, the socket box is placed in the workplace and fastened with paws or screws (depending on the model).

Fourth act. The outer frame is put in and the panel is screwed on.

Fifth. After all the steps taken, the electricity supply is turned on to check the operation of the device.
Installation of sockets in any apartment

Power calculation
For example, the apartment has: refrigerator, TV, washing machine and laptop. Their total power is about 3.5 kW. It is planned to add an air conditioning system, an electric stove, a PC, and replace the lighting scheme with a more advanced one. Energy use will rise. In order not to have to change the wiring, you should immediately calculate everything. Wiring data can be viewed in the table:

Bathroom standards
For spaces with high humidity, there are some features in the installation of electrical fittings:
- sockets are not mounted less than half a meter from grounded parts: sinks, pipes, batteries, fittings;
- socket outlets are installed 50-100 cm from the floor;
- “Above the baseboard” devices (in which the nests are closed with a lid after the plugs are pulled out) are mounted no closer than 30 cm from the floor.
Important! In wet rooms, a hidden wiring method is used.
Installation of sockets and switches in a panel house
The panel house has features:
- According to the open method, make the wiring, and accordingly, with such a laying, the sockets stick out from the wall and nothing needs to be drilled.
- Closed wiring. In a panel house (brick too) there is strong concrete and in order to carry out hidden wiring it is necessary to make strobes (preferably with a strobe cutter). For internal wiring, it is important to run the cable in a corrugation so that it is not subject to dynamic changes in the building (if the building sags or leads).
Important! Without corrugations, if it leads the wall, the core can break, which will lead to a short circuit and an inoperative state of the socket and switches.
Laying internal wiring requires wall gating. Electrical cables placed in a corrugated hose are placed in strobes. Then they are placed in the mounting box.
It is important to know! Cables from the corrugation must be led out at least 10-12 cm.
The boxes are fixed with plaster mortar. Then you need to give time to the solution to dry, and continue the process of connecting the electrical fittings.
Installation of sockets and switches

Wiring diagram for socket and switch
With proper installation and with correctly selected cables (if the wiring is already there, done by a professional, and you just decided to mount the outlet yourself), if the electrician did everything right, then:
- A white cable is inserted into the socket on which “L” is written, which corresponds to the concept of phase and power.
- A blue cable is inserted into the socket, which is marked with the letter "N", it is called zero. And, accordingly, if there is a ground loop, then a yellow or yellow-green cable “I_ _” is inserted into the socket with grounding.
To connect a conventional or two-gang switch, you need to assemble the box. White (wire) from it to the letter L. If the box is not twisted correctly, then the colors may not match.
Important! In some rulers, instead of white, brown is a phase. Then you need to do according to the instructions attached when buying.
Colors and Meanings: Blue is always 0. Yellow is ground. It happens instead of yellow black cable.
How to connect the socket switch and the light bulb is indicated in the instructions for these items. Following the electrical circuit, the process is fast. Usually the circuit is supplied with a socket or switch.

Wiring diagram for a two-gang switch with a socket

Wiring diagram for switch socket and light bulb
Installing a double outlet
Installing a double outlet is a little different. The main difference between double sockets and single sockets is the ability to connect two electrical appliances at once. Double are of 2 types: prefabricated and stationary.

Installation of a fixed-type double socket is carried out according to the scheme described above. It is only necessary to connect the cables to different plates. If this condition is not met, there is a possibility of a short circuit when current is applied.
The prefabricated type of double sockets is a little more difficult to install. In addition to the prepared tools, you will need to get a piece of additional wire. Its length must match the one connected to the undercut:
- if the device has 3 wires (one ground and two power), it needs 3 additional ones. The latter should be stretched between the undercuts. The one that has the output of the main wire is connected via a pair of cables to the terminals - from the auxiliary and the main.
In other undercuts, the connection is standard. Installation of a triple socket and block is identical.
Installing a power outlet
The peculiarity of power outlets is that they are almost always installed for an electric stove. They have their own characteristics and nuances:
- such an outlet is connected to a separate line coming from the shield;
- a prerequisite is the ability of the line to withstand a load of at least 40 amperes;
- a distinctive feature of the wiring is a significant thickness;
Power device - able to withstand more powerful loads.

Installing a power outlet is as follows. The socket is attached in the place where the power cable exits. Almost always it is near the place of the stove. Fastening takes place in all holes with dowels. The protection of the socket must be at least IP20. Insulation and connection is performed by twisting and soldering. For proper connection, you should pay enough attention to colors. This will allow you to connect ground, zero and phase without errors.

Related videos
The difference between the block of sockets and the usual socket is that the block has a larger number of seats. It consists of a plastic case and elements located inside: contacts, terminals and other components. The contacts are connected to the springs for the plugs. Most of the latest units are equipped with grounding contacts, which guarantee security when using the system, make it possible to reduce the voltage of connected sources.
The device of the block and its attachment points
You need to know the connection methods and the nuances of mounting the socket block.
There are several types of blocks:
- Designed to hide wiring. They are installed inside the walls and have a frame in the form of round recesses, which is designed for socket boxes.
- Designed for open wiring. This type is mounted into the wall using a lamellar socket.
In addition to these two types, there are also retractable modules designed to be mounted in furniture. They do not have any special differences from the previous two types.
Quite often, such blocks are installed in the kitchen. They are mounted, as a rule, at the level of 10-15 cm from the furniture or 30-60 cm from the floor. They are very convenient when using such low-power devices as small household appliances, a refrigerator, an extractor hood.
In rooms, as a rule, sockets are mounted in the immediate vicinity of the TV or desktop. Triple sockets are often used in bathrooms. These types of blocks must have a moisture resistant module. The distance from taps to sockets should not be less than 60 cm.
Connection options
 When connecting a unit of one group, it is necessary to use the daisy chain method. This refers to the connection of each member of the group to a common wiring power line. The stub chain is designed for a load of not more than 16 amperes.
The combined connection method using a parallel circuit is the most common, especially in European countries. In the countries of the former USSR, this type of connection is most often used when supplying electricity through individual lines to large consumers.
When connected in parallel, several cables leave the junction box, the first of which goes as a loop and provides electricity to 4 out of 5 outlets of the five-place block. Another cable is connected to the fifth socket, which is provided for connecting more powerful equipment.
The advantage of the combined type of connection is the redistribution of risks: each outlet does not depend on the operation of nearby circuit components. However, there are also disadvantages, consisting in the high cost of purchasing a cable and the laboriousness of installation work.

Both stub and combined methods are used to form open and closed systems. The first method requires the formation of a channel in the wall, where the lines and sockets for the connectors will be located.
The combined method involves pulling the PE conductor along the wall. Plastic channels make the system safer and aesthetically pleasing.
Most ducts are equipped with wire management baffles, which can be easily checked using removable covers.
 When choosing an installation method, it is necessary to build on the material from which the wall is made. If the walls are brick or concrete, then chasing will have to be applied. In other cases, the wiring can be left open.
Before starting work, it is necessary to de-energize the area where they will be carried out. In older houses where there is no automation, plugs should be unscrewed to turn off the electricity.
To carry out the work, you will need the following devices:
- block of sockets;
- plank;
- electric wires;
- socket boxes;
- a solution of gypsum or alabaster.
When choosing a block, you should pay attention to its quality. In order to install, you will need the following tools.

When choosing a crown, it is also necessary to take into account the working material. Depending on this, you should choose the most suitable nozzle, the choice of which is quite large today.
Marking on the wall
 Proper marking will provide convenience in carrying out the following operations. Before starting, it is worth checking the wall for the presence of various communications in it. If the walls are made of drywall, then you need to be extremely vigilant so as not to disturb the frame on which it is attached.
Using a ruler, marker and level, you need to mark the surface. You should also take into account the number of sockets in the block. The future location of the hole is marked with crossed lines, in the center of which small indentations are made . Drilling must be as precise as possible. so that the bit does not move during drilling.
Some difficulties may arise when setting the horizontal position of the holes. In this regard, a slightly larger crown (80 mm) should be taken. The drawing is best done in advance, which will greatly facilitate the work, as well as reduce the risk of incorrect wall marking.
Gating process

It is necessary to ditch the recesses for the seats along the drawn lines at first at low speeds, observing the desired position of the drill. For greater accuracy, the future recess should be marked with a drill with a small diameter, and then use the main crown to create a full recess. They usually collect pieces of material, which should be removed with a perforated chisel.
All cavities of openings should be cleaned of dust and residues of building materials. For this purpose, a paint brush, as well as napkins, are suitable. After that, channels are created between the recesses connecting the bulges of the socket boxes. If you need to create a personal line for one of the outlets, you should first make a channel.
When placing the cable in a corrugated sleeve, more reliable protection of the PE conductor is provided. You can ditch the partition with a hammer and chisel, although this is a very laborious and long process, especially if the walls are made of brick. For such walls, only mechanized chasing is suitable.
Installation of blocks in drywall
 Drywall is one of the most malleable materials., there are practically no difficulties when working with it. Using a special nozzle designed for drywall sheets, holes are drilled in the sheet. This job is pretty easy. However, excessive pressure on the drill should be avoided so as not to damage the fragile base of the sheet.
Boxes for installing drywall are equipped with special paws, which are located on the back side and tighten the glass into a niche. The gap between the wall and the sheet should be enough to place the block in it. If this is not possible, then you will have to ditch the wall.
The specifics of the installation of sockets
For the installation of socket boxes, it is necessary to use special glasses that are connected to each other using plastic clips. Glasses can have different shapes. They provide a reliable connection of all elements. Brick walls suggest that fastening will be carried out using gypsum or alabaster mortar. The ratio of water and mixture is 1:4.
It should be remembered that the creamy mixture dries pretty quickly: literally within a few minutes. The powder must be dissolved in small portions and immediately laid in the recess. The same solution is used when finishing the nearby side faces and the bottom of the glasses. After carrying out all these actions, the block is immersed in the hole. The correct position of the installed glasses must be verified using a level. Do not allow protrusions beyond the boundaries of the wall. After checking, the edges of the socket boxes should be carefully aligned with a mortar, thus achieving the most even surface. The rest of the solution can cover the wire going to the outlet.
If the walls are planned to be finished with tiles or plaster, the block should protrude slightly from the wall. This protrusion can be from 5 to 7 mm.
Principles of connecting electricity
 After the mixture has completely solidified, you can start connecting the indoor unit. If the socket has a daisy-chain type of connection, the wires go from the junction box to the first socket. The ends of the wire must be very carefully cleaned of the braid with a sharp knife. A side cutter is also perfect for this purpose. While stripping, leave a small amount of cable to make an additional connection if necessary.
It is necessary to hide the cable by folding it in a spiral way and laying it inside the block. To make bows, you need to prepare pieces of wires of different colors. It is necessary to ensure that the sections of the links are the same as those of the conductors of the power line. They should not be too long, because this will interfere with the correct placement of the outlet in the mounting box. The cut wires must be stripped from the insulating layer by approximately 1 cm.
Pass the wires through the adapters of the blocks, after ensuring their good patency and removing excess solution.

It will be easier to install the unit if the ends of the conductors are bent towards the terminals. It is necessary to remove the protective cover from the surface of the block, then tighten the clamping screws by 5-7 cm. The machined end of the phase of the supply cable is connected to the first socket. The position of the terminals must also be taken into account. After that, the PE conductor and the zeros of the supply cable are connected to the 2nd socket. Screwing the sockets too tightly is not recommended.
When looping sockets, the principle of polarity must be observed. The phase wire is removed from the phase with the terminal, and the neutral wire is from zero. It is necessary to connect the protective conductor in strict accordance with the requirement of the Electrical Installation Rules, which mentions the mandatory creation of only non-separable connections of this type.
 It is forbidden to ignore this condition, because then the risk of accidents increases significantly. For example, if grounding is removed at the main power point of the power outlet block during installation, other participants in this circuit will lose the protective zero. In the future, if the mains voltage falls on the housing module (in the event of equipment breakdown), the voltage will also be transferred to all other housings of electrical devices connected to the network.
Socket boxes with wires connected to the terminals are mounted in the recesses created. This mechanism is reinforced with side clamps, after which it is necessary to check the strength of fixation of all elements. To do this, you should use the building level and, if necessary, make adjustments. The open parts of the wiring are wrapped with electrical tape or treated with a heat-shrinkable sponge. After completing these steps, you need to tighten the screws tightly, fix the block module and put a decorative cover.
As you can see, the installation process of the socket block is not so complicated. With minimal skills and technology, this task can be easily handled. The main condition is that everything should be thought out in advance and prepared for work, taking into account all the nuances and features of the wall design in order to avoid unforeseen difficulties.