How to make wooden frames. DIY wooden double-glazed windows
Modern windows are distinguished by a variety of materials, shapes and colors. The world's leading manufacturers offer frames made of aluminum, plastic and natural wood... And no matter what material is used in the production of windows, thanks to new equipment and tools, all products are equally tight and durable. However, one negative point should be noted here - the cost of such frames is quite high. But to buy constructions that cost $ 100-300 each, just to glaze a small greenhouse, or not everyone can afford it. Therefore, the owners often have a question: "How are the window frames made with their own hands?" We will try to answer it today.
Preparing the necessary tools
As practice shows, the simplest and cheapest solution would be to create a wooden window frame. The tree is very convenient to handle, so even a novice master can handle this type of work. So, what materials do we need for this? First, you need to find completely dry or glued wood (regular plywood will do). A few of its sheets will be enough to complete the work on creating a window frame. Prepare a saw from the tools, as well as a hammer and chisel. Tools such as electric planers and cutters will greatly facilitate and speed up the process of making a window frame. However, in the absence of such equipment, the window frames with their own hands can still be made - it just takes more time and effort spent on work.
Additionally, you will need glass, metal corners, wood glue, and, of course, a drawing of the future product. If you have chosen boards as the main material, it is best to choose a material with a section of 50x150 millimeters.
How is a window frame made by hand?
Here we will look at how a window frame is made of glued laminated material. This material is highly reliable, durable and relatively lightweight. For glued laminated timber - exactly what you need. You can also use an ordinary timber, but such a product is unlikely to withstand more than one season of operation.
Having prepared all the necessary tools and drawings, you can safely get to work. First, we make a window frame. To do this, a groove is cut out in a board with a cross section of 50x150 millimeters so that in the profile the element is similar in shape to the letter "G". Thanks to this action, the window will be more protected from moisture and airtight.
About connection method
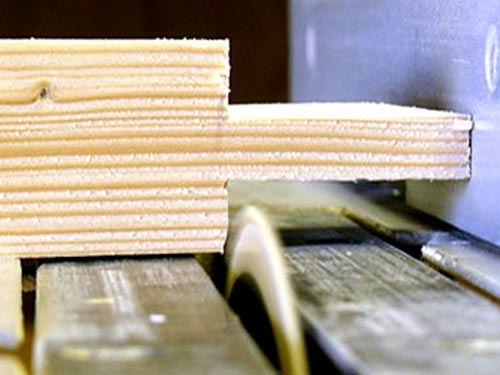
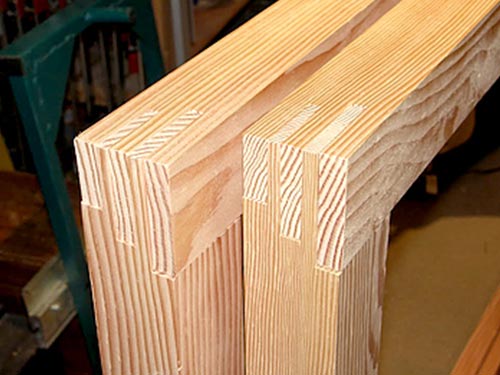
During the work, pay special attention to the connection method. It is important to remember that poorly glued boards will not guarantee the durability of the window frame, which means that all the painstaking work will go down the drain. The most correct and reliable connection option is spikes and grooves. You can make them on a hand-held milling machine. If this is not at hand, you can use the old-fashioned way - cut out all the elements with a saw and a chisel.
Please note that grooves are made only on vertical parts. On the boards that will be placed in the horizontal direction, a spike is cut out. After both elements are made, the joints are carefully processed with wood glue. The box should be connected with utmost care, observing the fastening angle of 90 degrees. After that, metal corners are installed in the corners of the ends. They can be purchased at any hardware store. Their main function is to rigidly secure the window frame and all the boards.
Before installing, you should wait a while until the applied glue is completely dry. At the same time, you can start making a wooden frame.
Sizes of a bar
It is worth noting that the timber for this element should have a smaller section - instead of 50x150 mm, you need to take 50x50 mm. The first step is to make a profile. When performing these works, do not forget to leave a small gap (1-2 millimeters) between the frame and the box. After that, the profile must be cut into blanks, in which the spikes are then cut and the grooves are cut. The frame boards are connected in the same way as the window frame.
The final stage
At the final stage, this element goes through the glazing process. Window frame and the box is equipped with hinges, and then both elements are treated with a special moisture-resistant agent to increase resistance to moisture.
Everything, our window is almost ready - all that remains is to paint and varnish the surface.
Production of plywood window frames
Since the factory technology for the production of window frames requires special expensive tools and equipment, it will be very problematic to make such products at home. That is why craftsmen have developed their own way of creating a profile by fastening strips of plywood. For such a window frame, 4 strips are enough - then a rectangle is fastened of them. The whole production technology consists in making several rectangles from plywood strips of different widths and fixing them together. This way you get the perfect plywood of the desired configuration. 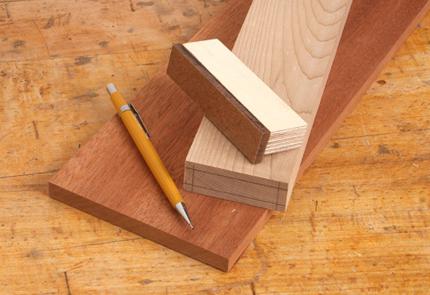
With the help of this technology, not only an ordinary blind window frame is made, but also a window with two and three panes. An element with one window is easy to make from 8 plywood strips. As a result, they form two rectangles (while their width is slightly different from each other). The strips of the second layer are cut a little narrower - this is necessary in order to secure the glass. Further, wooden (namely, all their parts) are connected using self-tapping screws. All fasteners are additionally processed with wood glue. Everything, window frames made of wood at this stage have been successfully manufactured!
Wooden windows have always been popular due to such positive properties of wood as: high heat-saving characteristics, environmental friendliness and durability.
One of the advantages is also the fact that making wooden windows with your own hands is a completely feasible task, even for a non-professional.
Of course, now they use more metal-plastic ones, which are cheaper and also have their own indisputable advantages, but still, wooden windows are a classic and they will always be popular.
Material for wooden windows
The most popular material for making boxes wooden window in our latitudes there is a pine. It is notable for its availability, low price and practicality. According to the characteristics of the material, pine is superior to oak, but it is more expensive and therefore, for the first time, it is better to stop at pine windows.
Process of creation
The basic requirements for the board are as follows. Firstly, it must be well dried, and secondly, it must not have knots and deformations. These conditions are important, since the box will experience the main loads, so its strength should not be in doubt.
Glued laminated timber box
The technology for making wooden windows with your own hands involves the use of glued beams to make a box. In this case, the box has the most robust design. Glued laminated timber is the compilation of individual boards into packages and gluing them along the plane. The boards in our case will be made of pine.
The size of the board is taken 15 * 5 cm. They are connected to each other by gluing. Then four holes are drilled and wooden pins are inserted into them. Such a connection will provide structural rigidity. The box is installed in the opening motionless, using self-tapping screws and dowels, and then, the cracks between the opening and the box are blown out with polyurethane foam.
Tool
It is necessary to briefly dwell on the tool that will be needed to make the window.
- The electric plane needed for cutting the board.
- Cutter for cutting boards.
- Rulers, corner, tape measure and some other measuring tools.
- Glue.
- Glazing beads, thickness gauge.
- Dowels and screws.
- Sealant.
- Protective equipment - eye protection goggles and normal work gloves.
If the window is going to be made for a summer residence in which you do not live in the autumn-winter period, it will be enough to limit yourself to a thin glass unit.
Window frames
Helpful information:
Pay attention to inexpensive windows made of wood "Krasnaya Gorka": frame made of double-layer glued beams (pine) 57x60 mm, single-chamber double-glazed windows.
Window frame
If you decide to manufacture wooden windows with double-glazed windows, then you need to start by designing the window frame. The minimum timber that you need to make the frame should measure 6 * 4 cm and will depend on the thickness of the window.
A profile for one window pane should have two rectangular rebates, and a window with two panes should have one more. Frame production begins with careful processing of the timber. Then, using a planer, we make all the markings, after which we begin the device of folds (grooves).
Making folds for the frame
The seams are made so that when the frame is already assembled, they are in a single plane. Otherwise, the glass will be poorly compacted. In general, the dimensions of the grooves depend on the thickness of the glass and the type of seal.
Note!
If putty is used as a seal, then the folds have a smaller width than when using glazing beads.
It must be remembered that strongly tapered folds will allow wind to pass through. The width of the strapping beam also affects the thickness of the grooves.

Final frame assembly
The window frame is assembled in such a way that the spikes fit tightly into the grooves. For a tighter connection, a spike must be installed. To do this, you must first drill a hole in the diameter of the thorn and grease it with glue.
In addition, a key can be used at the end of the frame boards to improve the connection. Its appearance will resemble a double dovetail. To do this, at each of the connected ends, a trapezoid hole is made, into which a key is then inserted. Before finishing the assembly, the joints are greased with glue, and after assembly, the remnants of the glue must be cleaned with a knife. When manufacturing a window with a sash, the installation of fittings will be added to the above works.
Glass preparation
To prevent the window from being blown out, you need to carefully adjust the glass to the size of the frame. To do this, you need to cut it with a diamond glass cutter. Before work, for safety, you need to wear glasses to prevent glass chips from getting into the eye and gloves, so as not to cut your hands. Glass cutting is carried out with a ruler, which must exceed the length of the glass. After we have drawn a line with a glass cutter, we move the glass to the edge of the table and, using pressure, break off the excess part. The glass should break off along the cut.

Glass insertion
Anyone who has an idea of \u200b\u200bhow to make wooden windows should know how to correctly insert a window into a frame. First, let's try the cut glass by inserting it into the frame. If the glass is cut correctly, then we take it out and begin to prepare the folds.
To do this, you need to apply sealant to them and insert the glass into the frame. We fix the glass with the upper glazing bead and fix it with a thin nail. When using a larger glazing bead, self-tapping screws can be used to attach it to the frame.
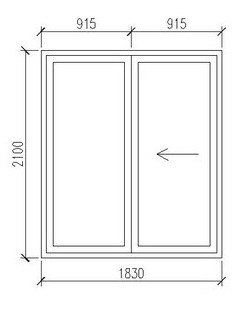
In the manufacture of windows, which consist of two halves, another timber is installed in the center, with the same grooves. One half of the window is made with a thinner frame and attached to the main one with hinges. In addition, a handle is attached to such a frame, and a groove for the closing mechanism is cut out.

Double wooden window
Manufacturing of vents
The vents in wooden windows are an integral part and are of several types: mortise, split and sliding. The latter represent a rather complex mechanism and it is difficult to perform them independently. The first option is manufactured together with a window frame and requires maximum precision.
The best option for vents in wooden windows are split vents, which are made separately from the window, and then, ready-made, are inserted into the frame.
Note!
When making a split vent, it is not required to use any special fasteners and special skills during execution.
The manufacturing technology of such vents is slightly different from the order of mounting the window itself, only for smaller sizes. The difference lies in the mounting of the opening mechanism, which usually represents hinges, and the fastening of additional fittings, in the form of a handle with a closing device.
Final work
After completing all the work, the manufacturing technology involves the lubrication of window surfaces with an antiseptic. After that, the window is placed in the opening and fastened in the grooves. Then we fasten with self-tapping screws that go through the box and fasten them to the concrete. Holes in concrete are made, most often, using an assembly gun.
After we have fixed the window, we blow out the cracks with a sealant. You need to wait for it to dry, and then plaster the sealing points. The work ends with the installation of the ebb and the window sill. Thus, you can see that making a wooden window with your own hands is not an impossible task, and this distinguishes them favorably from metal-plastic windows.
Instructions
Get a well-dried planed board to avoid window warping or shrinkage. Make a wooden window box. For its manufacture, you can use boards with a section of 50x150 mm. Make a groove on the board so that in profile the board has L-shaped... The resulting ridge will help seal the window. Use an electric plane for this work.
Then, in accordance with the size of the window opening, saw the board into 4 pieces and connect them together. The best way to make this connection is with a straight tenon and a straight groove. To create such a connection, you need to cut a thorn on one board (which will have a horizontal position), and a groove on the other. This work can be done with a saw, hammer and chisel, or using a hand cutter. Then coat the joints with wood glue and assemble the box. When assembling, it is important to ensure that the parts are connected at a 90 degree angle. To ensure a rigid connection, drill a hole in the end and insert a glue-greased wooden pin into it. At the corners to the ends, install window metal corners to strengthen the box.After the glue is dry, the box is ready.
Now you need to make a window frame, for which a beam with a section of 50x50 mm is used. The sequence of its production is the same as for boxes. Make a profile using a hand router or electric planer. To make the frame easy to open and close, you need a gap between the frame and the box of 1-2 mm.
Related Videos
note
Hand-made wooden windows can be used on verandas, balconies, in a bath, i.e. where a wooden window will serve as a barrier from environment... Consider making a single-leaf wooden window with your own hands. Now let's consider the construction of a wooden window. The window consists of a box that is attached to the window opening and the frame itself with glass. The box can be made of boards, for example, with a section of 50x150mm.
Therefore, without special equipment, it is unlikely that it will be possible to make a frame out of wood, like the one that is sold in stores. But for rooms in which there are no special requirements for windows, it is quite possible to make frames with your own hands. Consider how to make a window frame with your own hands, in a home workshop. To begin with, let's swing at the manufacture of the simplest, single-leaf design. Everyone knows that wooden frames dry out over time, losing their shape.
Sources:
- how to make a window frame with your own hands
Most people call a craftsman to change windows and insert plastic or aluminum frames. Their main disadvantage is the relatively high price and the need to use special equipment... Can I make a window frame with my own hands? What tools and materials are needed for this?
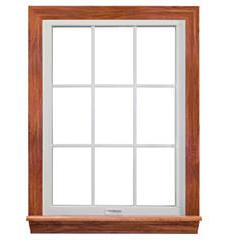
Figure 1. Wooden frames are environmentally friendly and have low thermal conductivity.
Indeed, for glazing a country house or greenhouse windows, it is not at all necessary to install a plastic frame - a home-made construction made of wood is also quite suitable.
What needs to be prepared
To make a homemade wooden frame, you need to purchase completely dry wood in the form of bars or their glued version. Many people use plywood to make the frame.
When choosing a material, you need to take boards with a section of 5X15 cm or a bar of 5X5 cm.The following auxiliary parts and materials will be needed:
- joiner's glue;
- window squares made of metal;
- glass.
You need a drawing and carpentry tools: a saw, chisels, a hammer. After everything is purchased and prepared, you can start working.
How to make a wooden window frame with your own hands from bars

Highly good stuff for work, often used in construction, is a glued wooden beam. You can use its usual solid wood version, but this increases the likelihood of the frame losing its shape due to atmospheric precipitation. This can be avoided by covering the tree with a special protective compound.
The technological process of manufacturing a structure consists of the following stages:
- The first step is to make a window frame. To do this, cut a groove in a 5X15 cm board so that the board looks like the letter "G" in profile. Such a comb is needed for the tightness of the future window.
- The dimensions of the structure are accurately calculated and they begin to saw the boards, and each of them must be divided into four parts of the desired size, and they are connected together. The most reliable option for such an assembly is to use a tenon and a groove. To make them quickly, you need the following tools: a chisel, a hammer and a hand saw or an electric cutter. The grooves are made on the vertical parts of the frame. Thorns are cut out on the horizontal segments. After the manufacture of all these parts, they are coated with carpentry glue and the parts of the box are connected, while not forgetting to observe the accuracy of all joints with a 90 ° metal square.
- The next stage of work is the strengthening of special window squares in the corners of the frame ends. They are purchased at the construction market or in a store, and they are necessary to give the required rigidity to the box.
- Give the glue some time to dry and start making a frame for the moving part of the window. The beam for it should have a smaller section than for the window frame. Therefore, its section is reduced so that the gap between the frame and the main box is in the range from 0.1 to 0.2 cm.
- Frame parts are connected in the same sequence and using spikes and grooves, as described above in the manufacture of a window frame.
- After complete assembly of the inside of the window, it is attached to the box with hinges. You must first insert a glass sheet, although this can be done after the frame is completely assembled with your own hands.
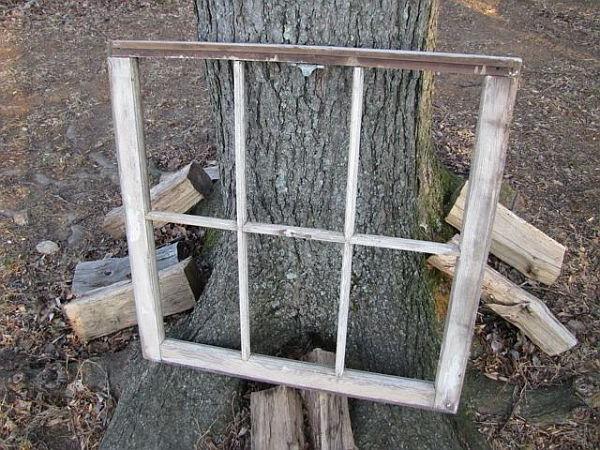
The structure is ready to work (fig. 1).
Plywood window production

If you try to make a factory-made frame profile at home, you can spoil the purchased material.
Therefore, to eliminate this problem, the frame with your own hands can be made from strips cut from a sheet of plywood.
To do this, it is quite enough to have four such stripes, which must be connected into a rectangle. In this case, do not forget to set a right angle at the ends of the structure with the help of a measuring square. To obtain the desired profile, the do-it-yourself frame is assembled from several such rectangles that have different widths.
At the same time, do not forget to make accurate measurements, otherwise the design will turn out to be lopsided. In this “hybrid” way, plywood can be used to produce curly-shaped windows.
This method is suitable for both fixed and multi-sash window structures containing one, two or three rows of glass. For a frame with one glazing row, it is sufficient to have 8 plywood strips connected in 2 rectangles. To secure the glass sheets, the second layer of strips should have a width less than the first rectangle.
On the veranda, I decided to make two large window frames, consisting of 8 cells with glass 40x30 cm. I also decided to change the frames in the room, to make them of higher quality. In total, I got 5 frames of three different sizes... I did them for 4 days - February 27, March 5, 9 and 10.
First, I'll tell you the frame manufacturing technology. I do not have machines, so I used a handy tool - a saw, a jigsaw and an electric plane. The frames consist of two stitched slats, one of which is 1 cm larger than the other, 2 cm in the middle. Thus, I do not have to “choose a quarter”.

I cut all the slats from the "inch" board. I had the best boards 25x100x3000 laid aside. Using a plane, I bring the thickness of the board to 20 mm. Then, with a jigsaw, I saw it along the slats of the required width.

For 8 glass frames, I needed 50, 40 and 20 mm. For other frames another 70 and 60 mm. With an electric jigsaw, I cut a board with a margin, if you need 40 mm, then a 45 mm saw. I cut off the excess with a plane.

When all the details are ready, I assemble the frame on the table.


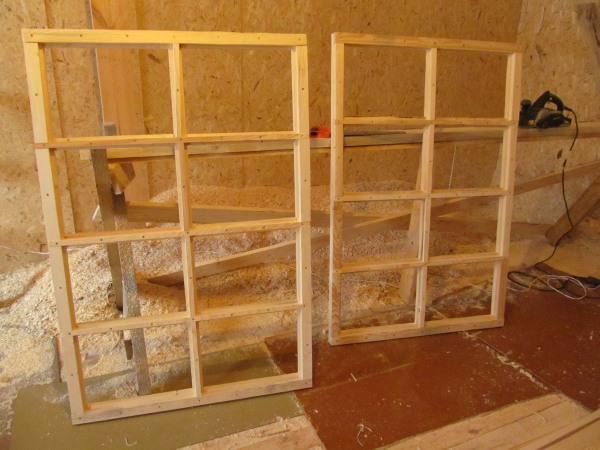
I made the frames for the room in the same way. The only condition is that the window opening in the room already exists and has its own size, so I had to "dance" under it.


In the summer, I will sort out the frames and glue the PVA joints with glue. After installing the glasses, I will smear all joints from the street side with a transparent sealant. I will also treat the frames with an antiseptic.
Why are these frames good?
- They are easy to manufacture.
- They cannot be dismantled from the street, since they are bolted to the box from the inside.
- It is impossible to remove the glass, because the glazing bead is nailed from the side of the room.
- The glass is small; even a child cannot fit through it.
Why did I decide to replace which I made and which are already standing?


Firstly, they are not made very high quality - large gaps between the slats.
Secondly, I used decorative curves, which are good from the street, but bad from the house, since they take away the light (the light opening becomes smaller in area). In the new frames, the glass opening is only 1 cm smaller on all sides than the glass size, namely the width of the glazing bead 1 cm.
Old windows will go to the veranda and shed. There will also be a frameless wall window on the veranda. I have already thought about the technology, it remains only to implement.