Area for a photo session at a wedding. Ideas for decorating a photo zone for festive events and thematic photo sessions. Photozone frame. Variants
The wedding photo zone is a special space where the newlyweds and guests can take pictures.
Often it is a photo wall (background), as well as accessories, photo booth. This is both entertainment and an additional opportunity to capture a joyful day.
Today we will tell you how to make a photo zone for a wedding with your own hands. Interesting ideas and tips on how to make photo props, as well as ready-made templates that you just need to print and cut.
Where to place a photo zone
The corner for photo shoots can be arranged right at the place of celebration or at the entrance to the restaurant. If you are planning an outdoor wedding, there are more options, the natural decorations themselves are a great backdrop for photographs.

The photo zone should be placed in a place where guests will notice it, but at the same time, not in the middle of the aisle, so that it does not interfere with anyone. If the pressure wall is at some distance, make a sign from the entrance that will orient the guests.

The photo zone usually does not take up much space, an area of 2x2 meters is enough.
Ideas for a photo zone at a wedding
The photo zone should be decorated in the style of a wedding. Then it will become an additional decoration of the holiday, and looking at the photographs taken, guests, even years later, will be able to feel the same mood and atmosphere.

The design of a photo wall depends on both the theme of the wedding and the place of celebration and the budget that you are willing to spend on it. The most important detail of a photo zone is its background. It needs to be thought out most carefully. The more unusual and interesting, the better.

Framework
Picture frames are a great accessory for a wedding photo shoot. Frames of absolutely any shape, size and material will do.

They can be suspended in the air, fixed to a frame, or left portable. Photos are bright, vivid, memorable, and you can even completely abandon the background for the photo zone.

Slate boards
Slate boards for a photo shoot are good in two versions.
Large ones are great as backgrounds. On them you can write and depict whatever your heart desires.
Well, small ones are like props. Guests can write their wishes on them, take pictures and you will receive wonderful wedding cards with congratulations.
Posters
A similar option. If there is no way to get slate boards, put more paper (preferably craft or colored paper) and all kinds of felt-tip pens in the photo zone. The principle is the same - guests write congratulations and take pictures with signs in their hands.
It's great if there is an opportunity to organize instant printing of photos at a wedding - then the postcards will be ready right away!
Furniture
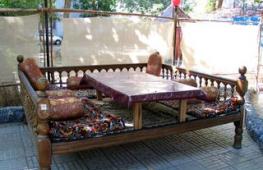
If space permits, you can arrange the photo zone with furniture. Photos are guaranteed to be stylish and memorable.
This could be a vintage sofa or armchair, a chest of drawers, a staircase, or even a door. Again, choose based on your capabilities and imagination and don't be afraid to experiment!

DIY wedding attributes
Photos will turn out to be brighter, and guests will have a lot of fun if, in addition to the background, you prepare props for the photo booth.

These can be hats, wigs, scarves and boas, as well as all kinds of lips and mustaches. Attributes for a wedding are easy to do with your own hands if you download our templates with props ( there are 3 of them, so there are also three download links).
Enjoy your preparation and a fun wedding photo session!
When attending master classes on organizing a wedding or courses for newlyweds, do you often hear about the need for a photo zone at a wedding? Today the authors of WD will tell you more about what a photo zone is, why it is needed and why in 99 cases out of 100 it is still worth ordering :).
To begin with, we note that a photo zone is a solution to many problems.
- Where to take pictures with young people?
- How to make pictures original?
- What to do before your wedding ceremony?
- How to entertain guests?
- How to emphasize the style and concept of the celebration?
There is only one answer to all these questions - PHOTOZONE, photo theater, photo wall!
Let's start answering all the questions gradually and see why such a sector in a wedding is one of the best wedding solutions!
What is a photo zone? This is a corner, a special zone, a sector on the territory of the celebration, where anyone can take beautiful pictures. Remember how tedious it can be to wait for the young before registering. But everyone brings with them amateur cameras or often two or three photographers work at a wedding! Give your guests the opportunity to take bright and unforgettable pictures at your wedding.
Why do you need a photo zone if the ceremony takes place in a picturesque place... Personally, I consider only castles or very luxurious restaurants, summer grounds on skyscrapers or historical monuments of the city as picturesque. Nature, leaves and a pond will look trite on amateur photographs. In addition, there are likely to be other visitors on the territory of the hotel or park, who will be included in the frame.

In addition, you must agree that it is almost impossible to really surprise guests with a wedding venue. In any city there is a limited number of places where you can have a tasteful visiting ceremony.

Photozone style. The general view of the photo wall can be the best way to emphasize the concept of the wedding, highlight accents and help guests understand your idea. Agree, not everyone can appreciate it. A photo zone is a great way to use garden tools, a haystack or a watering can with humor :).


Below I will tell you more about which photo zone will suit your style of celebration.
Photozone type. Photo theater can be of several styles:
- Wall. In this case, various attributes are placed on the shelves around and create a background for photographs.


- Window. A screen with framed windows creates the impression of an art gallery and makes it possible to take pictures of more people.


- Corner. A specially decorated area allows guests not only to take pictures, but also to relax. By the way, it is the corner-style photo zone that gives the effect of having a decor even outside the restaurant hall.


- Chalk board. Another area of the photo wall, which is suitable for various types of weddings.

- Press-wall (press-wall). Custom and printed canvas with initials, names, wedding date or other images.


How to fill the photo zone? If you decide to save money and make your own photo zone, just browse the selections on the Internet and choose the style that suits your celebration.
I note that it is always more profitable to make a photo zone in an agency, because there you pay not for a purchase, but for the rental of attributes. When organizing a wedding yourself, you have to buy all this.
The attributes of the photo zone may include candlesticks and cells, photo frames and photo frames. Soft toys, pillows, furniture - from symbolic stools to chic sofas. Bicycle, haystack or villas, exotic plants or animals, balloons, flowers, paper decor and even a piano!


Wedding style. Now let's consider which photo theater to choose in accordance with your holiday. Based on the style of the celebration, select a rough sketch and start working on creating a photo zone right now!
- ... Ropes, seagulls, boat, steering wheel and nets. Don't forget the blue, stripe, and captain's cap!


- ... If you want a classic luxury wedding, the press wall is your best option. Place it in a restaurant and we are sure that your guests' photo session will continue throughout the evening!


- Rustic. This style is characterized by simplicity and conciseness. Hay, flowers, imitation wood and other simple yet vibrant elements will create the right atmosphere.


- Shabby chic, provence, vintage, retro. If you are planning a wedding in one of these charming styles, you can use white decor and some frayed items from your grandma's chest.


- An eco or country wedding is a great excuse to use chalk boards as a backdrop for your photos.


- For a color wedding, use a photo zone in your chosen color palette!


- If the space of the restaurant is decorated with some details - a beautiful painting, a piano, a corner with sofas - then a photo zone can be organized around this place.


- For a budget wedding, order your photo theater supplies and use the simplest backdrop to create your photo wall.


- For stylized weddings, be sure to pay attention to the fact that the photo zone is made in a given theme.


- will decorate such a fence, painted in bright colors!

A few tips for those planning to organize a photo zone or a photo theater at their wedding.
1. Be sure to make a signpost that will tell guests the direction of travel.

2. Are you planning to make a photo zone with windows? Then take care of a backdrop or a decent backdrop!

3. Next to any photo zone, put attributes for the photo so that guests have something to experiment with :).

4. When making a photo zone with your own hands, pay attention to the stability of the structure, the presence of spacers and legs.

We hope our tips will help you arrange your photo zone correctly and give your guests the opportunity to take stylish, original and unique pictures!
The idea of installing a photo zone for a wedding came to us from the West. It represents a sector, a corner on the territory of the celebration, where any guest can take a beautiful photo. To make this space harmonious, you should use the same textures, colors, elements that are used for the main decor of the ceremony. This rule is especially important in themed weddings. The photo zone can become a real hit among guests, and interesting accessories will allow you to take unforgettable pictures.
Where is the best place to place a photo zone at a wedding?
Placing a photo zone for a wedding helps to solve several problems. Newlyweds and invitees can take excellent pictures. The question of originality is immediately decided, because a correctly composed wedding photo zone contributes to obtaining exclusive pictures. In addition, this corner on the territory of the ceremony becomes a decoration in itself, helps to avoid platitudes when filming in nature and to entertain guests.

As a rule, it is better to place a photo zone at a wedding away from the place where the main fun is taking place. So it will not block the main actions, will not distract, but will allow those guests who feel embarrassed to relax. The ideal place for a photo zone at a wedding is nature, where there is a forest, fresh air and natural greenery. If you can't place a photo platform there, you can come up with a lot of other options. The main thing is to adhere to the following rules:
- The place for the photo zone should be as convenient and comfortable as possible at the wedding. The minimum area is 2 sq.m.
- The model and the photographer should not experience discomfort when moving in the space reserved for the photo session. This site should not interfere with the routes of guests, block the aisles.
- If the photo zone is designed separately from the room, cafe, restaurant where the banquet is taking place, then you should take care of signs to notify the invitees about the presence of such a space.
Creative ideas for the design of the photo zone
Any wedding photo zone requires appropriate design. You can do without the help of a designer and do it yourself. The background is considered the most important accent in the photo zone: bright draperies, beautiful wallpapers, different designs, garlands, etc. will come in handy here. Decorating a photo zone for a wedding is the case when you can turn on creativity, play a trick, experiment. Add more accessories: crowns, hats, mustaches, balls, pillows, signs with inscriptions, frames - everything comes in handy. With so much variety, guests are bound to want to take fun pictures.
Do not forget to take into account the general direction of the celebration, because this will help to emphasize the style and place the necessary accents:
- If the wedding is classic, then the photo zone is designed in the form of a wall with beautiful paintings and frames. A corner with a sofa and an imitation of a burning fireplace will perfectly fit.
- For a retro style, decorate the wedding photo zone with beads, sequins, fabrics in muted tones. Imitation of a retro car, printed or painted on cardboard, will fit well.
- For a nautical wedding, choose a photo zone with a picture of a ship's cabin, sea, ship accessories such as a rescue boat, ropes, steering wheel, captain's cap, fishing nets.
- Celebrations of the shabby chic, rustic style are very popular, which imply the use of pastel colors, natural materials, floral ornaments, aged objects with scuffs and cracks.
- For fabulous motives, suits and figures of your favorite characters for a wedding in a photo zone are suitable.
In the form of old frames
Antique frames with monograms are an excellent idea for decorating a photo zone for a wedding. You can organize a whole picture gallery or just use frames of different formats, but in any case, such a corner will look very interesting and unusual. Guests can hold the frames, fool around with them - as a result, photos with different emotions and moods will come out. The background should create contrast with the frames, for which light shades are ideal.


Comic layouts
Portable layouts with comic design are an interesting and funny idea for a wedding photo zone. These can be figures of famous people, fairy-tale characters, bride and groom, fictional characters, etc. Holes for faces must be cut out in each model. Such props will give guests great fun, improvise to the fullest at the wedding.


Decorative screens and curtains
Decorative curtains and screens made of various fabrics and materials can serve as an excellent background for a wedding photo zone. If you don't have anything suitable in your bins, then look into a fabric store - there you will definitely find something interesting. Curtains and screens for weddings can be installed both outdoors and indoors, they can be monochromatic, multi-colored, with patterns, all kinds of prints and designs.


Bright background of ribbons of different texture
Ribbon decor is suitable for a photo zone of any orientation. There are a lot of options for decorating a photo zone using ribbons, but the simplest is to pull a rope onto which to string ribbons of different textures. They can be of several shades of the same color, three colors, or all colors of the rainbow. You can play not only with shades, but also with texture, using different patterns and materials. If there is wind, then the ends of the bands will need to be weighed down. Such weights can become part of the design concept of a photo zone - small photographs, pompons, postcards, etc.


Banner with a big inscription
A banner with a large inscription is an excellent thing for decorating a photo zone for a wedding. You can order and install it outdoors, in a restaurant, or in any other place where the celebration will take place. This is a great way to make your wedding photos memorable and interesting. You can do whatever you want, but in most cases such wedding banners have a romantic focus.

Such a wedding trend as the use of all kinds of props and accessories for a photo session in a photo zone is very popular. These can be crowns, lips, mustaches, glasses, butterflies attached to a stick. Another current trend is “talking” props for a wedding, such as garlands with inscriptions, volumetric wooden letters, cardboard flags, slate boards, paper clouds with words.
For example, slate boards give a lot of room for imagination, every guest who is being photographed on them will be able to write a wish, draw a cartoon or a huge heart. To have more opportunities, it is worth stocking up on a couple of packs of white and colored crayons. For a photo shoot, it is better to choose several different formats of boards, so the pictures from the point of view of composition will be more interesting.

You don't have to limit guests to one type of accessory. Instead, offer a whole assortment for a wedding in the photo zone for every taste:
- huge glasses, voluminous multi-colored wigs, sombrero;
- ladies' wreaths, hats, fans, carnival masks, bows, wedding tiaras;
- men's theme for a wedding - pipes, pistols, captain's caps, flasks;
- musical instruments - balalaikas, bandura, saxophone, guitar, harp, accordion;
- wedding accessories - boas, umbrellas, suitcases, hats, feathers, glasses;
- edible - coconuts, oranges, pumpkins, apples, grapes, watermelon, chili peppers, sunflowers, strawberries;
- transport for the wedding - scooter, bicycle, rollers, motorcycles;
- toys - sabers, guns, chess, volumetric soft toys, dolls;
- items for entertainment for the wedding - easel, newspapers, soap bubbles, fishing rods, candles, crayons, hammocks, books;
- sports equipment - boxing gloves, helmets, hula hoops, jump ropes, rope, tennis, balls, golf clubs.
How to make a photo wall of flowers with your own hands

In this master class, we propose to make a special wall of artificial flowers for a wedding for a photo zone - it will serve as an excellent area for festive photos. Remember that the more colors you make, the more colorful and brighter the photo wall will look. To create a floral background for a wedding you will need:
- plain wall;
- thin corrugated paper;
- double-sided adhesive tape;
- double-sided decorative tape;
- scissors.
Step-by-step instruction.
The photo zone was born together with photography: it is a specially prepared and decorated background on which photographs of the participants of the solemn events are taken. The moment painters did and do without it - the background, at the request of the customer, can be completed later. Art photography is considered a form of art much simpler than painting, but it has a very difficult nuance: you can no longer slap a missed moment on a light receiver (film, matrix of a digital camera). Make a collage in Photoshop or another photo editor? To make it look natural, you need to coordinate lighting, perspective and many other subtleties, such that it can be easier to draw a scene with your hands, looking at the picture, which turned out to be like a sketch.
Light, decor and mood
The photo zone for the holiday can be decorated in a variety of ways in any style, both at home and outdoors - there are no generally accepted and even more established canons here, if only the pictures are interesting and memorable. But there are still more than just technical circumstances that must be taken into account when organizing a photo zone. The first is light. For an experienced photographer, who takes a couple of trunks with equipment on a call, it can be difficult to put the light at the shooting location, at least so that the harsh shadows from the noses do not spoil the picture. There is no need to talk about guests who are just “clicking” (sorry, “taking pictures” - there have been no mechanical shutters in a wide photo routine for a long time) on devices / gadgets. A properly arranged photo zone should soften any, incl. changing during the festival, the light so that a more or less decent picture is obtained offhand from any "digital dish". But there is not enough light for this, the photo zone should create a mood by itself: so that against her background the inflated capricious child looks like a cute prankster, and the big uncle who has taken on his chest "to the color of a pig's snout" - like a shirt-guy who is tipsy. Here's how to make such a photo zone with your own hands, and this material will be. With the condition: that even in urban conditions, its production took less time and money than finding and renting a suitable finished one.

Organization methods
Let's take a closer look at the venue of the future festival and decide which way it would be better to arrange the photo zone:
- Naturally without a backdrop, lighting means (see below) and additional decor - ideal if local conditions and time of year permit; see fig. right and ex. the fragment at the bottom right in Fig. above. Which, alas, is not always the case.

- With a soft frameless backdrop - if the environment allows you to soften the working light when taking photos, incl. from a flash "in the forehead". Opportunities for this can be presented both at home and outdoors.
- With a reflective (diffusing) backdrop on the frame - if, when examining the place of the photo zone, future difficulties in setting the light are immediately noticeable. The design of a photo zone with a frame backdrop is somewhat more complicated and will cost more than a frameless one, but it allows a complete amateur “by eye” to satisfactorily supply light in almost any conditions.
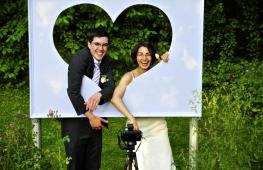
Tantamaresques and arches
As an addition to any photo zone, a small frame backdrop in the form of a so-called. tantamareski - background for photography with slots for faces and / or torsos or (rarely) full-length figures, see fig .:

The Tantamaresca is also a purely photographic invention; people of older generations who visited popular resorts remember the then photographic backgrounds with scenes sometimes truly amazing in their incredibility and art of embodiment. It is still trivial to act as a mustachioed thug in the form of a mermaid with a bust # 8 in the arms of a muscular pirate with a fierce face.
But the very idea of a tantamaresque is by no means trivial: the frame highlights the object (for example, a face) against the background, without cutting it off completely. A kind of tantamaresque - a common frame for a picture, which is (s) hung in a suitable place or just given to hold by the photographs - exaggerates the background somewhat. This is justified if he is pleasant and good in the world, but somewhat monotonous, for example. foliage in the orchard, see fig .:

"Mobile photo zone" from baguette frames
The tantamareska frame is all the more appropriate if the guests have consumed some amount of fun before taking the photograph. They have already been exaggerated themselves, and the frames will fit them into a naturally serene (and sober) background.
Note: Frames made of real baguette are quite expensive, heavy, and their backside stains hands and clothes. For a "mobile photo zone" it is better to buy cheap foam frames and paint them with bronze oil paint a day or three before the ceremony.
The ceremonial arch is a decoration not only for a wedding, but also for any celebration. The arch on the holiday itself can serve as a photo zone. Joker kits (see also below) for assembling festive arches are rented, but not cheap, and there may simply not be “jokers” in the hinterland. At the same time, it is not difficult to make a ceremonial arch with your own hands from available materials - after all, it is not an entrance and not a walk-through in the house and not a garden one.

If you are more accustomed to working with wood, the arch for the photo zone can be made like a clothed garden pergola. Its front and rear (conventionally) parts are the same; they are made according to the drawing in pos. 1 fig. The set includes only 3 standard sizes of parts: A and B are cut from scraps of boards (16-40) x150, and the crossbars C connecting them are made of round timber D40 (holder for a shovel or mop. You can use a 40x40 rail; then the crossbars are placed at the joints of parts A ( half-sockets 40x20 are cut at the ends A.), and everything is connected together with steel corners.When the arch depth is more than 500 mm, thrust bearings or holes are not required for installation on the ground or the floor in the room.

making a ceremonial arch
The frame of a simple (not volumetric) ceremonial arch of any shape can be very quickly and easily bent without a pipe bender from a metal-plastic water pipe. Such arches (pos. 2) are rented at a minimal price. If the arch is homemade and intended for outdoor installation, its legs can simply be dug in or stuck into the ground. For indoor installation, the legs are inserted into plank or plywood crosspieces (inset at pos. 2 and see below).
The decorative possibilities of an arch on a simple frame are limited, so volumetric arched frames, pos. 3. The base of this can also be bent from 3-6 branches of the same metal-plastic pipes. Their ends for indoor installation (of course, on the ground too) are inserted into holes drilled in wooden blocks, and after leveling the base of the frame, they are fixed with liquid nails or other nitro glue for wood.
The next operation is tying the branches of the frame for rigidity with a knitting wire D (1.5 - 2) mm. Tiers of strapping are knitted with a turn of pipes with knitting wire at each intersection; The contour, rounded in section, is formed by bending the wire outward (inset at pos. 3). For greater rigidity of the frame, it will be useful to knit with oblique transitions between tiers. Finally, the harness is painted with white paint, and the wooden heels of the outer arch are covered with turf, carpet, etc. Simple, but skillfully decorated, such a homemade arch in appearance will not yield to the coolest "joker", pos. 4.
Backless
Photo zones without a specially made backdrop are arranged in cases where the environment itself softens the light, or the natural light is soft enough. The first is a room with a whitewashed ceiling and light, preferably whitewashed walls. The second is shooting in clean transparent open air in spring or early autumn. Natural light is still harsh, but backlighting with a flash (see below) in this case whitens shadows well, because the light performance of the flash is similar to natural light.
The simplest way to organize a photo zone in a light, in a common white room is new curtains for the holiday, pos. 1 in the figure:

To obtain soft working lighting, taking into account shooting with a flash, the window behind the curtains should face east, south or southeast, and the curtains themselves should be:
- translucent;
- a general tone close to white, slightly yellow;
- drawing of curtains - large, rare, warm unsaturated tones.
If the room is decorated in a light and warm tone, but not white, then at a distance of 0.7-1.5 m from the wall it must be partitioned off with draperies made of white translucent fabric, pos. 2. Flash illumination should then be given without re-reflection from the ceiling, see below.
For an outdoor photo zone under the canopy of trees in ordinary lowland areas of middle latitudes, the best soft backdrop is made of white ribbons 10-15 cm wide, pos. 3. Glare from the light breaking through the foliage does not need to be suppressed at all, they work for the overall effect. But too bright and sharp glare can unacceptably blot out the picture, this is where the ribbon photo zone will work: the fabric will act as a diffuser and a diffuse reflector, and edge diffraction on ribbons swaying in the breeze will smear the sharp boundaries of highlights and shadows.
A similar solution is used when shooting is done in a room with a color-fragmented design, for example. decorated with brick or wild stone. In this case, ribbons are taken contrasting in color, but not in brightness, and approx. equal color saturation with the decoration of the room: if it is warm, then coldish (pos. 4), and vice versa. This solution allows you to avoid very unpleasant visually "dirty" tinted shadows. For more information on the features of organizing a photo zone against a brick wall, see the plot:
Video: photo zone - imitation of a brick wall
Note: dark hearts forfeits in pos. 4 - the result of absorption of light with multiple reflections. This also unpleasant effect is especially pronounced when shooting with flash. The simplest way to correct it is to stick circles of white or colored paper on the cores.
The opposite case in color is an outdoor photo zone in the mountains or in an ecologically clean seaside. Natural light is harsh, its maximum brightness is shifted towards the blue side. Shadows need to be highlighted, but the flash light is not soft or lukewarm, to put it mildly. In this case, the backdrop is also made of ribbon, but in warm tones and more saturated (approx. 65%), pos. 5.
Another special case is a photo zone in a room with white painted walls and glossy floors. Even if you shoot without a flash, with special illuminators, the reflected light will have a strong polarized component, which gives a lot of unpleasant effects. "Polarik" (a polarizing light filter "will not help much here, without bright background sunlight it will make the picture dull and flat. The way out is to hang rare garlands of artificial flowers of even more saturated warm tone, pos. 6. Diffuse re-reflection and edge diffraction will soften and warm the work light.
The role of additional decor
Additional decor of the photo zone plays a significant role in its lighting technology. Dark gaps in phantoms in pos. 4 fig. The above example is negative, but a much greater positive effect is possible from the decoration of the photo zone.
For decorating a photo zone, decorative fans (forfeits), artificial flowers, garlands, swag, wings, lambrequins and other decorative curtains are most often used. For the same purpose, homemade Christmas tree decorations, for example, can be used quite successfully. paper balls. It is convenient to use phantoms to decorate a ready-made background that is already suitable as a photo backdrop, on the left in the figure:

Paper flowers can completely cover the most inappropriate background, as well as use them when enhanced scattering of direct and / or reflected light is required, see above. Garlands of neutral tones are suitable as a background for a photo zone in cases where colored decorations are inappropriate, for example, in a church, on the right in Fig. The designers of religious buildings are well versed in lighting technology, and if photography is allowed there, then most often it is possible to shoot with a flash "straight into the forehead" without fear of hopelessly spoiling the picture. For more information on the general principles of decorating a photo zone, see the video:
Video: photo zone decor
About flowers for a photo zone
Making artificial flowers is a series of separate big topics. For a photo zone, it is advisable to choose those whose cores, under direct illumination with hard, rather coherent and polarized light from the flash, do not show a dark dip in the image. Visually, it can be imperceptible, but there is still no lens that sees like an eye and is not expected.
Of paper flowers, peonies and roses are best suited for decorating a photo zone, see fig.:

The first - especially since they are simply obtained from forfeits. Let's say this: at first we decorate the photo zone only with phantoms. We take a test shot, examine, analyze, and, according to the results of the analysis, we convert some of the forfeits into peonies. For making artificial flowers with your own hands, see the video selection:
Video: homemade flowers for a photo zone
and about the installation of large colors on the background of the photo zone:
Video: installation of a photo zone made of paper flowers
Background separately
All remarks regarding lighting technology and decorative design of the photo zone are true for her with a movable hard backdrop. But the possibilities of a photo zone with a separate backdrop are much wider, if only because it can be positioned in an optimal way relative to the available lighting. Not to mention the fact that on such a backdrop you can hang a fairly heavy volumetric decor and something else, see below. Therefore, even if you have all the possibilities to organize a photo zone with improvised means, the option of at least a small additional one with a separate backdrop should be considered, if only there is enough time in the pre-holiday chores.
A hard solid backdrop made of wood or plywood is good because the guests who walked around will not knock it over or break it just like that, and you can decorate it with anything, even with buckets of water. But as for the light - tricks with ribbons and garlands do not work here. This is partially compensated by the possibility of optimal setting of the background itself, but shooting in backlight (back) lighting is excluded. For outdoor installation, the jibs of the rigid backdrop are dug into the ground or fixed in an L-shaped bent reinforcement bars (item 1 in the figure); for installation indoors or on a paved area, you need to make a heel-paw, pos. 2.

The most widespread in all respects are favorable frame backdrops for the photo zone; for them sets "Joker" are produced and sold, pos. 3. The background cloth on the Jokers is attached with a cord through the eyelets. To self-made structures on steel tubular (pos. 4) or wooden paws (pos. 5), the panel is pinned behind with a furniture stapler or push pins. In that other case, the protrusion of the paws forward is not less than 1/8 of the height of the frame; back twice as much. Construction material - timber from 50x75; assembly on steel corners or joinery joints. The permissible width of one section without intermediate supports is 1.5 m when assembled on corners from pine timber and up to 3 m from oak in a carpentry way.
Frame feet
The most labor-intensive parts of the photo zone back frame construction are paws. If the frame (or the frame of a wooden rectangular arch) is placed on the ground, instead of them, you can use "pyataks" in size from 450x450 made of plywood with a thickness of 12 mm, pos. And in the fig .. In this case, the frame needs a beam from 100x100. The foot pads are attached to the ends of the legs with 5 self-tapping screws (4,2-6) x (120-150) envelopes. The foot pads themselves are pinned to the ground with L-shaped reinforcing bars, one per corner, and covered with turf or decor.

In other cases, it is possible to make universal support crosses (pos. B) from boards with a thickness of 40 mm or more. They will then be useful for a New Year tree, building scaffolds, etc. The legs of the frame are not fastened in the crosspiece with steel: it is assembled on pairs of self-tapping screws through the faces into the ends of the boards. The legs of the frame are inserted into the slots and wedged with wooden wedges - it will be quite reliable.
A special case
It also happens that, according to a general desire, an entire outdoor feast becomes a photo zone. In this case, the backdrop for it needs a large, especially strong and stable. He will also fence off the feasting from prying eyes.
Drawings of the frame of a durable tube-welded screen - backdrop of the photo zone are given in Fig.:

Drawing of the frame of the screen - a large durable backdrop for the photo zone
Fastening the background panel - with a cord through the holes in the frame. An option for not particularly exuberant fun - the edges of the cloth are tucked up and swept with thread # 10 or harsh. At the table in front of such a screen (the extension of sections in length is possible) 20 people can be accommodated. And - at least sleep with a soulful face in a basin with Olivier, at least dance topless in a dish with kebab. And a photographer (or an operator with a video camera) knows himself to shoot - he has seen something else at work.
Screen and light
The photozone in the form of a folding screen (see fig.) Is suitable not only and not so much to cover up an indecent revelry. Its decisive advantage is the ability to deliver good light in almost any shooting conditions. due to the different flap of the wings. As a result, the photo zone - a folding screen is not picky about the decor. In terms of color and brightness, it can actually be anything, because the lighting technology of the resulting film booth has almost no effect.

Examples of the most common cases of setting light using a photo zone - a folding screen are shown on the next page. rice.:

Left - shooting with a high bright sun in the "industrial" slightly dusty sky. The grid - the cover of the filming booth not only softens the light, it “knocks down” its polarization due to edge diffraction on the filaments, which in such conditions is quite significant. In the center - shooting in partial backlight with a low position of the Sun. On the right - a photo zone at home and shooting "puff on the forehead" indoors on a phone or tablet. In all cases, the cabin height is 2.2-2.4 m; the width of the central section is 1.5-2 m, the side sections are 1.2-1.5 m.
Covering the photo zone
There are several options for trimming the back of the photo zone with your own hands:
- Pure white (not shiny!) Translucent canvas - ideal in terms of lighting technology, weight and dimensions and ease of use. Disadvantages - if an awkward guest knocks over the backdrop (it's a holiday), the cloth can tear or get dirty so that you can't do without washing, and you can't attach heavy decor. Another minus - the slots for the frames are laborious, although if the frames are foam, they are quite feasible.
- Plywood, fiberboard or chipboard painted white (see below) is a durable, but quite expensive and laborious material. Withstands any decor, tantamaresque openings can be frameless. The backdrop can be larger in size than the frame and of a complex shape. Lighting qualities are limited: shooting in backlight is impossible, the backdrop and wings can only work for reflection, but not for transmission.
- Packaging corrugated cardboard, painted in the same way, is a cheap or completely waste material, very easy to process. The disadvantages are the same as for sheet materials from before. In addition, it is fragile, tantamaresque openings should be decorated with light frames, and the traces of bends should be covered with decor.
- Roll paper and wallpaper on the back side are only suitable for a small children's photo zone at home, and then if there are unnecessary ones.
- Expanded polystyrene (preferably not granular foam, but extruded EPS) - is produced in sheets with a thickness of 4 mm. It is very light, lighting performance is almost equivalent to woven fabric, but it is quite expensive and fragile, easily dusty. Suitable in 2 cases: for a light and non-corrosive tantamaresque eye, additional to the main photo zone (pos. A) in fig. below, or if you need to quickly install a backdrop of a complex shape and / or larger than it, pos. B. Expanded polystyrene, as you know, is easily cut with a knife and glued with PVA.

How to paint the backdrop?
The rigid backdrop of the photo zone must be painted with water-dispersible (water-based) paint for ceilings and walls. Any other, incl. acrylic bath enamel does not sufficiently diffuse reflected light and in most cases increases its coherence and polarization. Either, and the other, and the third gives glare, dips in brightness and dirty undeveloped shadows in the picture.
Implementation examples
So, we will assume that the boring, but necessary technical details of the photozone device are over and we can do more pleasant and not so laborious things - decorating the photozone for various occasions. The most common ones are birthday and wedding. Birthdays are generally more varied in nature than weddings, so let's leave them for last.
Photo zone for the wedding
A wedding is an extraordinary and irregular event, with expenses for it they are not stingy, therefore a wedding photo zone is most often made to order. However, a do-it-yourself wedding photo zone is also not uncommon, especially in places where it is difficult for a good designer-decorator to reach or the owners cannot afford his services.
All the design features of the photo zone described above are also valid for a wedding. But from the technical point of view, the photo zone for a wedding is somewhat simpler than others: the wedding color is white, and the optimal color solution from the point of view of lighting technology is also as much white as possible. In principle, a wedding photo zone can be realized in the dream of any photographer - with shadowless or almost shadowless lighting, see eg. video:
Video: wedding photo zone
Note: just in case - a bearded anecdote; perhaps not very appropriate. "Mom, why does the bride always wear white for the wedding?" - "Because, daughter, that white is the color of joy" - "Ah, well, now I understand why the groom is always in black!"
But there are pitfalls in the design of the wedding photo zone. One of them, common to all photozones in general, we will consider at the end. Second, don't whiten the area too much. Too much joy is boring, and a wedding is still not a boxing thing for photographing objects. For an unforgivable mistake when preparing a photo zone for a wedding, see also the video:
Video: mistakes in making a wedding photo zone
Birthday Parties
A birthday photo zone is more complicated than a wedding one. First of all, in lighting technology: the brighter, more variegated and more varied its decor, the more fun the holiday will be; after all, the bride and groom are hardly very interested in the decorations of the festival. But the more difficult it is for the decorator and the photographer / operator: it is harder to put on the light and / or to shoot with what is available.
Anniversary figures
One of the ways to fix things is the so-called. blockhead; volumetric non-directional or weakly directional diffuse reflector or light absorber. In the studios, material decor is used for this: vases, large bouquets, pedestals, columns, etc. But there is a kind of light dummy, which itself asks for anyone's birthday - these are volumetric figures showing the new age of the hero / hero of the occasion.
Examples of volumetric figures for birthday age are shown in the figure:

In practice, when staging the light, they are used as follows: they take a test shot of an already framed scene with extra people, but without numbers. They look where it is necessary to highlight with reflected white or slightly colored, where to muffle a too bright spot, and, based on the results, decide what size, color tone and brightness the dummy numbers should be and where to put them. Technically, the birthday numbers are usually made of polystyrene, decorated with paper flowers (which is also true lighting technology), see the video:
Video: volumetric figures for a photo zone made of foam and napkins
From a year old to a kid
A photo zone for the anniversary of a big uncle or aunt is really a matter of their taste. They either themselves know what they want and how to do it, or they will find funds to pay for decorators who will equip the zone so that everyone will like it, and the photographer / operator's work was not hard. But the children's photo zone is a completely different matter. Here one cannot do without the active participation of parents: the child's psyche from the beginning of understanding the world and himself in it (1-3 years) up to the age of full maturity (16 - 25 years) has not yet developed, the tastes have not yet settled down. Here you need to be especially careful about the choice of the general style of design of the photo zone, not forgetting about its technical features, see above.
Wigwam
A universal photo zone for the birthday of a child of younger ages is his playhouse. If he does not yet have one, and it takes a long time to build or it is impossible (for example, in a small apartment), it will be completely replaced by a play tent (hut).

The wigwam is especially convenient in this respect. You can do it yourself at home in just 1-2 hours, the kids always like it. It is enough to add a little festive decor (see fig.) And, possibly, replace the casing with a new one (if the wigwam already has it) - the photo zone is ready. Give only the opportunity for the hero of the occasion to play pranks to his best (but within reason), and he, very likely, will laugh at these pictures already being a grandfather himself.
The smallest
A photozone for a year old is usually advised to make a child in the form of a kind of nest. However, the baby (s), although perhaps still a baby, is already beginning to learn about the world and look at things consciously. A year-old child is not yet able to understand what was done there in what style, but the peculiarities of his visual perception must be taken into account.
A one-year-old child is still poor at distinguishing small details. Cold colors seem dull or even gray to him, and sharp color and / or brightness contrasts cut the eyes and scare. Therefore, you need to design a photo zone for photographing a one-year-old child like the one on the left in the rice: in warm soft colors. In plain sight, you need to place a rounded large decor (helium balloons and a chair in this case), and smaller ones "for a picture", move yourself and the guests to the upper corner: what is there, the baby will not consider. If small decor is necessary for technical reasons (see above; in this case, this is a figure), then it must be made very small so that for the child it merges into a solid pleasant background.

Photozone in the center in Fig. - the decision is dubious in color: a child in it can get bored and even capricious, letting the whole holiday go down the drain. Well, in the photo zone, which is on the right in the figure, most likely it will just get scared. In addition, about the self-registration of a photo zone for a one-year-old child, see the video:
Video: photo zone for a year for a child
Little ladies ...
The fact that any little girl is a princess, even when she sits on a pot and pushes, is a common place. There are countless examples of the design of a girl's photo zone in an aristocratic-heraldic style. Not a bad universal solution, but in the mass consciousness it is already boring, like everything that is too much.
Another universal solution for decorating a photo zone for a birthday of a young girl is a candy bar, see fig.:

Literally candy bar is a café-pastry shop, where you can immediately devour the purchased snacks and drink something tasty too. Therefore, the basis of the photo zone - the candy bar - is a sweet table that guarantees a good mood for the birthday girl and expressive pictures. The rest of the design rules are common for children's photo zones: soft warm colors, a fairly large rounded decor. If you need to cover an unsightly background with a small decor (for example, a wall), its details must be arranged in a certain order so that the child gets the impression of a larger pattern (to the right of the center in the figure).
Photo zones for the birthday of older girls should be organized taking into account their creative interests (favorite book, artist, for example) and, if possible, using educational and developmental moments. If, for example, a birthday girl is completely indifferent to literature, then when she finds herself in the photo zone on the left in the figure, she may be interested: what kind of wonderland am I in? Well, Alice was there, and your name is similar. And where is this camp of miracles? Well, here, if you want, read it.

Photo zone on the right in fig. designed for a more developed girl. Who is able to think for herself: how does the poodle Artemon from the book about Pinocchio fit into the Eiffel Tower? And gradually discover the depths that I had not previously suspected. Of course, if they are available and understandable to parents too.
Note: also about the design of a photo zone for a girl's birthday, see the video:
Video: photo zone in the girl's room for her birthday
... and gentlemen
As for the boys 'photo zones, then in no less carriages and crowns in girls' ones, pirate "bells and whistles" and the like have become boring. Moreover, if the child is thoughtful, contemplative and does not give him pleasure to cut from the shoulder with a saber.
Universal solution for a photo zone for a boy's birthday approx. from 3-5 years old also exists, and much more effective for its development than the robber-military. This is a photo zone in The Great Gatsby Party style, see fig. Its coloring is black and gold. The contours are clear, sharp or, for the youngest, rounded. Drawn fragments in pin up style. The sweet table is by no means forbidden. Instead of the name of the literary hero Scott Fitzgerald, of course, the name of the hero of the occasion in his native language - in Cyrillic, in Arabic, albeit in hieroglyphs.

The Great Gatsby photo zone has a strong suggestive (subconscious) effect on boys of any kind, up to the most abstract dreamers. She encourages you to set a goal in life (not necessarily material and / or financial) and achieve it. And then the photographs against its background will remind you of what has already been done and what remains to be done. About the design of the photo zone "Reception at the Great Gatsby" see the video:
Video: birthday photo zone for a boy
Note: if a society of his friends and girlfriends gathers for a child's birthday, it is better to decorate his photo zone, as for a children's party, see next. video:
Video: photo zone for a children's party
In conclusion about the error
Now let's remember what we promised: what is the main mistake in organizing any photo zone?

The photo zone at the wedding is becoming more and more popular. It is perfect for any event venue: restaurant, garden, veranda. Guests can get great pictures with their camera or from a working wedding photographer. We will share ideas for decorating a photo zone, tell you how you can make your own photo wall from paper flowers.
Banners for a photo zone
Thanks to the design of the wedding photo wall, you can convey your imagination to the guests. Let's highlight the popular banner styles:
- Frames. Open windows, picture frames inserted into the wall with curtains, will give the appearance of a picture exhibition. They can fit several people for a common photo.

- Shelves. Such a banner is made in the form of a wall from a room, shelves are placed, and on them the requisites, for example, photos of newlyweds, vases, books.
- Soft corner. It will serve as a wonderful seating area and a place for a photo shoot.
- Brand wall. The names of the husband and wife, the date of the wedding are printed on the canvas and the color is selected in accordance with the style of the celebration.

- Chalk board. Various inscriptions are applied to the wall using chalk from white to multi-colored tones.

Photo zone design ideas
Every married couple dreams of making the dream of recreating the perfect wedding a reality. Let's take a look at what your celebration can be:
Classic
There are couples who love everything by their standards and to keep their parents happy with the decor, so they opt for a classic decor. In this case, it is better to use Brand Wall for the photo zone. The banner can be placed in a restaurant, which will not negatively affect the desire to be photographed by your guests.
Ocean
Attributes of the ship will be added to the decoration, these are the mast, nets, steering wheel, seagulls, ropes. The main color should be light blue or blue. As an accessory, a captain's hat, mustache, pipes, a live parrot can serve.
Rainbow
The design is based on a multi-colored palette of silks, satin ribbons, artificial flowers in colorful robes.
Country
A chalk board is used as a banner. Inscriptions are applied on it in accordance with the theme of the wedding, the names of the spouses, the date of the wedding.

Rustic
This style will be appreciated by people who love the vastness and beauty of the fields. Flowers, artificial wood, moss, wildflowers, hay, natural and classic colors are preferred for decoration. This type of design will add a spiritual atmosphere and will please the guests.


Retro
The colors of the decorations are pleasant tones: beige, sandy, pink. Hats with laces, small bibi hats with veils are used as accessories. The background will be complemented by old worn things of yesteryear.
A budget option
Ribbons on the arch, a table, a beautiful tablecloth, vases with wildflowers, artificial paper flowers.


In a certain tone and style
Here, the design of the photo zone is taken as the basis for the color of the celebration, it can be lilac, red, purple, white, blue and a certain direction in which the theme of the wedding is conceived.
DIY photo zone made of paper flowers
We offer you step-by-step instructions for preparing paper flowers for further design of a budget photo-wall. In order to do the work with your own hands simply, you need to stock up on the necessary tools and materials:
- Double-sided decorative tape and tape;
- Wall in one color;
- Corrugated paper;
- Scissors;
Manufacturing steps:
- We cut the paper into rectangles measuring 0.50 × 0.25 cm. We fold the resulting parts into an accordion and cut one end into a semicircle with scissors.

- We open the resulting accordion and glue the ends with double-sided tape.

- We open the bud and prepare the required number of flowers to fill the wall.
- Having prepared the required number of flowers, we decorate the wall, glue the buds with decorative tape.

Below you can see another option in the video for making paper flowers for a photo zone:
Types of photo zones made of paper flowers:


Preparing a photo zone in a restaurant and outdoors
In the restaurant
Most often, weddings are held in a restaurant and cafe. And the question of the decor of the photo zone is not so difficult. There are certain rules to follow, and the photo session will be perfect for your celebration.
- It is necessary to place the photo zone against the wall, so you will save money on the purchase of a special frame, boards for the background. But in the case of a large number of guests, this option is not a winning one. A large flow of people will not allow the photographer to work calmly and to enjoy the photo session will not work.
- If the wedding takes place during the warm season, it is better to move the photo zone to the courtyard of the restaurant. Since tired guests and newlyweds in the photographs turn out to be tired and exhausted.
- It is necessary to distribute the photo-wall further from the aisle and windows. So the photographer will not capture the passing guests, the rays of the sun will not fall into the camera lens.
- The light for the photo session must be correctly selected, it must not be bright or monotonous. It is better to prepare the photographer in advance for this event and show where the main photo session will take place a day before.
Outdoors
The desire to hold a photo session in nature is a great idea for guests.
- This will not give you a reason to get tired of sitting in a closed room and monotonous waiting and will give the guests beautiful memories of your holiday.
- An excellent choice in summer and hot weather.
- Distribute the photo zone under the shade of trees that will shelter guests and newlyweds from the heat.
- And the trees will serve as a good frame for hanging paper garlands, with the names of the newlyweds, the inscriptions: "LOVE", "NEW WEDDING". Various decorations in the form of hearts, ribbons, flowers, swings.


We hope our advice will be able to help you choose the right type of photo zone design, in accordance with your preferences.
Video material on the topic of the article: