Disposable cardboard column formwork “Formwork-Tula. How to make a pile foundation for a bath with your own hands
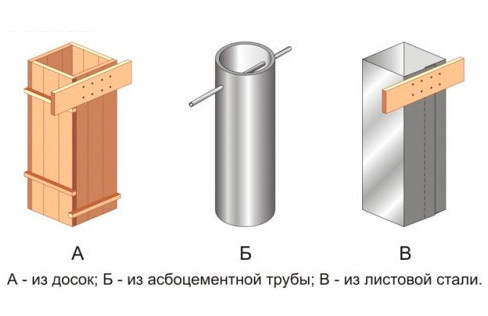
In the standards SP 22.13330, SP 50.13330 for the design and construction of the foundation, a round and square section of a vertical rod for a columnar foundation is laid. Therefore, in addition to panel formwork, it is allowed to use plastic, asbestos cement pipes, which are more convenient when making structures with your own hands.
A columnar foundation is outwardly similar to a bored pile, however, roofing material formwork in this case is unacceptable. Piles always rest on a layer with a bearing capacity, the pillars are buried a maximum below the freezing mark, which does not guarantee that this level will be reached. Therefore, backfilling with non-metallic material (sand or crushed stone) is a prerequisite. Roofing material is not able to provide either the spatial rigidity of the formwork, or high-quality waterproofing of reinforced concrete.
Monolithic columnar foundation technology in various formwork
Column foundation is used on non-powdery soils with low level UGV. Due to the shallow depth and small support surface, the structure is excessively mobile under the tangential forces of the freezing soils.
Therefore, a prerequisite is free access to the widening of the pillar in the lower part for waterproofing the sole, backfilling the sinuses of a pit or trench with sand, gravel. In these nonmetallic materials, the heaving forces are minimal, the pillar is not subjected to pulling loads even when the adjacent layers get wet or freeze. Construction technology looks like:
- excavating soil from a pit or making trenches with your own hands under load-bearing walls;
- backfill with 20 cm of sand, 20 cm of crushed stone with layer-by-layer compaction with a vibrating plate every 10 cm;
- pouring concrete - 5 - 7 cm of concrete screed to level the cushion, protect roll waterproofing from damage by rubble, reduce the protective layer of reinforcement in the upper reinforced concrete structures;
- waterproofing with Bikrost or Technonikol (2 - 3 layers) for protection from groundwater;
- concreting the sole into the formwork with the installation of a reinforcing cage (horizontal mesh + vertical rods tied with clamps);
- installation of asbestos-cement, plastic pipes or panel formwork for the post;
- filling the structure with concrete with vibration compaction every 40 - 60 cm in height;
- strapping with a monolithic or beam grillage to give the structure spatial rigidity and stable geometry.
The advantage of plastic pipes is the absence of roughness on the outer surface. In the event of tangential forces from freezing soils, there is practically no friction, the pillar cannot be pulled out.
Layout and excavation
When installing do-it-yourself cutouts, you must consider the following factors:
- in a building spot, it is necessary to pull the cords along the axes of the bearing walls;
- the diagonals must match;
- additional markings will be required to develop trenches or pits.

To increase the supporting surface, the columnar foundation is broadened with slabs, for which formwork will need to be installed. The perimeter of the sole is usually twice the cross-section of the pillar. It is necessary to lay drains along the perimeter of the building, to backfill with rubble. Usually 11 cm corrugated, smooth pipes are used, so the width of the trench will be 30 cm, the depth 30 cm with a slope of 7-10 degrees to one side.
Thus, when using asbestos-cement pipes for pouring pillars, it is necessary to retreat from the outer surface of the walls 0.7 - 1 m. For panel formwork, 1.2 m around the perimeter.
If polyethylene pipes are used as formwork, bored pile technology can be used. No excavation is required. Wells are made in the ground with a widening of the base with a special tool (for example, a TISE drill), a reinforcing cage is mounted, the structure is poured into the pipe, the formwork remains on the body for the entire period of operation. In this case, it is enough to pull the cords on both sides of the pipe on each wall along the rags (two pegs with a horizontal jumper).
Sole
The classic columnar foundation has a slab sole, which is made by hand in stages:
- backfilling of the pillow - 40 cm of crushed stone at a high GWL to ensure drainage with layer-by-layer compaction of every 10 cm with a vibrating plate, 40 cm of sand at a low GWL, 20 cm of sand + 20 cm of crushed stone on loam, sandy loam;
- pouring the foundation - square formwork, size 100 x 100 cm for a post with a section of 40 x 40 cm, screed thickness 5 - 10 cm;
- waterproofing - 2 - 3 layers of roll material (fiberglass with double-sided bitumen coating) with an overlap of 10 cm, sealing the joints with mastic;
- casting of the sole - formwork 80 x 80 cm high 30 or 60 cm with mesh reinforcement (reinforcement 10-16 mm of periodic profile), release of vertical rods of the same diameter to the height of the pillar + 30-40 cm for connection with the grillage armopoyas.

For asbestos-cement pipes as a permanent formwork, the technology is completely identical to the above method. In the case of using plastic pipes, the sole is concreted using a different method. The widening in the well is filled with concrete, a reinforcing cage is lowered into it, consisting of vertical rods (10 - 16 mm), tied with clamps (6 - 8 mm). The lower ends of the bars are bent at right angles to connect the sole with the body of the pillar. The structure is positioned centrally to provide a 2 cm cover for the reinforcement.
Formwork installation and reinforcement
Shields made of plywood, edged boards, OSB boards are installed by hand on a sole that has gained at least 50% strength. The specificity of a columnar foundation is the phased filling of several elements of the same structure. The pillar can be reinforced together with the base at the stage of its pouring or have a separate frame. The first option is preferable, therefore, in traditional technology, the shields are assembled around the reinforcement structure installed at the previous stage.
Panel formwork
This do-it-yourself technology is used most often, provides high quality, resource. Panel formwork is assembled for a columnar foundation in stages:
- cut - boards from OSB, plywood are cut to size or hammered from edged boards;
- installation - after vertical placement around the armored belt, the alignment with respect to the walls is checked, the jibs in two levels (at the sole, in the middle part) are attached to the shields, trench walls, pegs driven into the ground;
- fixation - in addition, studs can be used, with which the shields are attracted to each other.

A 15 - 30 cm protective layer of metal elements must be monitored without fail. It is forbidden to place bars or clamps closer than this distance from the inner walls of the formwork.
Using polyethylene pipes it is enough to put on a piece of suitable diameter (from 30 cm) on the reinforcement cage, inside the well. The pipe is protected from lateral displacement by earthen walls, so additional fixation is not required. It is enough to check that the rods and clamps do not come closer than 2 cm to the inner walls.

Asbestos pipe formwork can be installed in any of the above ways, with minor differences:
- fixation against lateral displacement is mandatory;
- the borehole diameter should be 20 cm larger than the outer pipe size.
The last condition is due to the pipe material. If on the slippery surface of polyethylene the heaving forces move up without causing damage to the pillar, the soil is guaranteed to push the asbestos pipe out. Filling the sinuses with sand is a prerequisite for normal operation. It is almost impossible to make a well with a diameter of 45 cm with a hand drill or a motor-drill. Therefore, asbestos pipe formwork is more often used in trenches, pits, by analogy with panel formwork.
Why you can't use roofing material
Individual developers who do not have a specialized education often use roofing material formwork. This option is designed exclusively for deep bored piles. With spontaneous compaction of heaving soil after several years of operation, this leads to the following consequences:
- in winter, the adjacent layer at the columnar foundation freezes;
- heaving forces are directed upward tangentially to the body of the column;
- the structure is pulled out of the ground, rising a few centimeters;
- earth is stuffed under the slab or the sole of a pillar that is not connected to it;
- the pole cannot go down to the design level;
- the building is warped, the walls are cracking, the roof is breaking chimneys.

Roofing material formwork inside the well cannot provide sinuses sufficient for backfilling with sand. The concrete has a serious weight and expands the roll material close to the walls of the mine. Therefore, roofing material formwork is suitable exclusively for bored piles.
Fill
When placing concrete inside the panel formwork, a concrete pump hose is the best option. However, the rental of special equipment is expensive; manual filling is more often used. The size of the panel formwork allows the mixture to be dumped out of the bucket without additional devices. If asbestos pipe formwork is used, an improvised funnel is first made of sheet steel, roofing material, paronite.
The depth vibrator is applied as soon as the length of the hose is sufficient to immerse the nozzle. After that, every 40 - 60 cm of concrete is compacted. The appearance of cement laitance, rapid closure of the funnel after removing the tip, the absence of bubbles indicate the normal mixing quality of the concrete.
Grillage
![]()
Pillars are a budget option for the foundation with their own hands, but they have unstable geometry. Therefore, a rigid strapping of the headings of the columnar foundation is a prerequisite at the final stage of construction of the zero cycle. Depending on the location of the beams relative to the surface of the earth, the grillage can be hanging, ground, buried. In any case, the beams should be 7-15 cm from the ground, depending on the clay content in it. In practice, two methods are used:
- backfilling a 15 cm layer of sand into the ground / buried formwork, removing it from under the beams after curing with concrete, protecting the side surfaces with sheet materials from spontaneous filling of the air gap with earth;
- laying a 5 cm layer of foam under the grillage between the posts
In the first case, the swollen soil does not reach the bottom of the grillage, it cannot tear the beams from the posts. In the second version, the foam is compressed by the heaving forces, preventing the filling of the lower space with earth.
The formwork for the hanging grillage is constructed by hand using the technology:
- deck making - panels along the width of the walls with square or round holes for posts;
- deck installation - shields are put on the pillars so that the heads are embedded by 20-30 cm, the deck is propped up from the bottom with tables (two pegs with a horizontal lintel with a pitch of 0.5 - 0.7 m);
- installation of side shields - attached to the deck from both sides, the height of the sides is 5 - 7 cm higher than the design level;
- reinforcement - a classic scheme of longitudinal bars tied with square, rectangular clamps, at the corners, at the joints of the walls, the bars are bent onto the adjacent tape;
- concreting - laying the mixture, vibration compaction in one direction along the ring.
For a ground, recessed grillage, the lower deck is not needed, only side shields are used. The expansion joint is provided by backfilling a 15 cm layer of sand, after which the structure is reinforced and poured. After stripping and removing the poured sand, the lower level is protected - the installation of vertically arranged asbestos sheets along the inner, outer perimeter.
Thus, when choosing different formwork, you can reduce the budget for the construction of a columnar foundation or maximize its resource. In the first case, it is necessary to use polymer pipes using bored pile technology. In the second option, it is worth choosing a panel formwork or asbestos-cement pipes.
Advice! If you need contractors, there is a very convenient service for their selection. Just send in the form below a detailed description of the work that needs to be done and you will receive offers with prices from construction teams and firms by mail. You can see reviews about each of them and photos with examples of work. It is FREE and non-binding.
When choosing the type of foundation, the characteristics of the soil on the construction site must be taken into account. If you need to build a building without a basement on difficult soils, then a pile foundation will be an almost ideal option. This option of the foundation is also more economically profitable, since less is spent on its construction building materials, than usual. For building reinforced concrete piles special formwork required. Most often, this is a non-removable form made of thick cardboard or pvc.
For the construction of small buildings weighing no more than 130-150 tons, a foundation on bored piles is often used. This version of the foundation is chosen for construction on complex soils - loose, oversaturated with moisture, etc.
For the construction of piles, a well is pre-drilled, the depth of which exceeds the depth of freezing of the soil in a given area by at least 50 cm.After that, a formwork is installed in the well and the piles are concreted. The cost of bored foundations is lower than that of monolithic strip foundations, therefore such a structure is often used in private construction.
Features of the pile foundation
A pile is a reinforced concrete rod, which is made by pouring a concrete solution into the formwork installed in the well, or by driving the finished rod into the ground. Foundations, consisting of piles, have a lot of advantages, among them:
- No need to dig a pit;
- Limited material consumption.
However, the most important advantage of such a foundation is that it can be used for the construction of buildings on difficult soils:
- If the top layer of the soil is weak (sand), then the use of pile foundations allows transferring the load exerted by the building to the lower and denser soil layers.
- If the house is being built on dense soils, then the use of this technology can reduce the amount of time-consuming earthworks.

Types of piles
Several types of piles are used in the construction of foundations:
- Driven;
- Screw;
- Printed.
The first two options for piles are rarely used in private construction, since special mechanisms must be used to drive concrete pillars.
The process of installing bored piles is much simpler, they are made directly in the ground. A well is being carried out, then the formwork is installed - cardboard or pvc. Next, the reinforcement is installed and the concrete is poured.
Types of formwork used for bored piles
The simplest way to manufacture bored piles does not involve the use of formwork. The concrete solution is poured directly into the prepared wells. However, this construction method is not the most rational.
The fact is that in order for the concrete to gain strength, it is important that the content of "cement milk" in the mass is sufficient. When the concrete solution is poured directly into the wells, the "milk" is absorbed into the soil, so the concrete cannot gain the required strength.
To eliminate such a "leak" of liquid, an independent production of the simplest formwork from roofing material is used. The material is simply rolled into the tube and inserted into the well.

Today there is an opportunity to simplify the work on the construction of bored piles. For construction, permanent formwork is used, made of cardboard or PVC, or removable formwork in the form of a metal or plastic pipe.
Fixed formwork options
An inexpensive and fairly simple method of building bored piles is the use of disposable cardboard formwork. This is the simplest formwork, which consists of a polymer base wrapped in a spiral with thick cardboard.
To prevent the cardboard formwork from absorbing moisture, it is covered with a layer of waterproof polymer glue. Technical characteristics possessed by cardboard formwork:
- The diameter of the cast structure can vary widely from 15 cm to 1.25 meters.
Advice! Recently, cardboard formwork of not only round, but also square or rectangular section has appeared on sale.
- The wall thickness of the formwork can vary between 3-15 mm, depending on the diameter
- Fixed cardboard formwork is available in lengths up to 11 meters.
- The mass of formwork forms, depending on the diameter, ranges from 1.8 to 9 kilograms per linear meter.
Advice! Due to its low weight, permanent cardboard formwork is installed without the use of lifting equipment.
Removable formwork
For the construction of bored piles, removable formwork can also be used. Such forms are represented by pipes made of steel or plastic of the corresponding diameter. The molds are installed in prepared wells, poured with concrete, and after 2-3 hours they are pulled off from the cast structure.

Two or three hours of exposure, as a rule, is enough for the concrete to "set" a little, and in the future the piles would not change their shape and size. This construction technology has a minus - the piles under construction are not waterproofed from the surrounding soil.
To somewhat compensate for this disadvantage, it is recommended to make a sand layer between the surfaces of the piles and the sides of the wells. This will reduce the negative impact of freezing soil on the piles. If necessary, using removable formwork of different diameters, it is possible to create piles with an expanded base, cone-shaped piles, etc.
How is the pile foundation built?
The construction of the foundation with the device of bored wells is carried out as follows:
Well preparation
- Well drilling can be carried out using a hand drill or an electric drill.
- Well sizes are determined by the project. It is important that the hole is deep enough to penetrate the weak soil layers. In addition, it is necessary that the depth of the well exceeds the depth of soil freezing in this area by at least 50 cm.
- The width of the well is determined by the design diameter of the pile and the need for sand bedding.
Formwork installation
Formwork should be installed in the prepared well. It can be cardboard or plastic formwork, which cannot be removed, and will act as waterproofing. Or it will be a removable formwork in the form of a pipe of a suitable diameter.

The formwork is installed in prepared wells, and sand is poured around the formwork. The functions of the sand layer are to protect future foundation piles from movements of the freezing soil.
Reinforcement execution
To strengthen the structures under construction, its reinforcement is used. To create the frame, 3-4 metal rods with a diameter of 6-8 mm should be used. The stubble is fastened along the length every half a meter. The length of the reinforcement cage should be such that, after installation in the well, it protrudes 3 cm above the soil level.
The frame must be installed so that the distance between the reinforcement and the walls of the formwork is at least 2 cm. This will ensure the formation of a protective layer of concrete for the reinforcement, which will prevent corrosion processes.
Concreting
- Concreting is carried out in layers, the height of the layers is 40-60 cm.
- After laying the next layer, it is necessary to compact the concrete mixture using a vibrator or manually (bayonet).
- It is important that the process of concreting the pile is continuous. If the previous layer of concrete has time to harden before pouring the next layer, the pile will not be solid.
So, for the device of the pile foundation, different formwork options can be used. The choice of the best one is carried out depending on the project of the foundation and the type of soil at the construction site.
Benefits
- Economical. Requires fewer materials, namely concrete and reinforcement, compared to strip and slab foundations.
- Does not require the manufacture of removable formwork. A permanent formwork is used, the production of which takes a small amount of time.
- The foundation of bored piles can be easily made independently without the involvement of special equipment and hired labor.
disadvantages
- Unlike tape, there is no way to make a cellar and basement.
- More detailed design is required in contrast to tape and slab.
Average service life of a pillar foundation made of bored piles: 150 years.
Design of a columnar foundation made of bored piles
- The total weight of the future house is calculated.
- We make an examination of the soil (test drilling). We find out the bearing capacity of the soil, the groundwater level (GWL) and the depth of soil freezing (GPG).
- We calculate the number of pillars of our foundation and their location around the perimeter of the house. The calculation will depend on 2 factors:
- The poles must carry the full load of the house. The calculation takes into account the bearing capacity of the soil. In order to increase the area of \u200b\u200bthe supported surface on the ground, widening at the bottom of the pillar is used (the average value of the heel diameter is 400-600 mm).
- The distance between the posts should be within 1-3m (average value is 1.5-2m).
Drilling of the wells
We drill wells for piles. In this example, the diameter of the holes will be 25 cm to a depth below the freezing depth for a given area. Suppose we have a freezing depth of 1.5 m, therefore, we will drill to a depth of about 1.7 m.
To calculate the depth of soil freezing, you can use our calculator: Calculating the depth of soil freezing. © www.site
For drilling, you can use a TISE drill with a diameter of 25 cm, a garden drill with a diameter of 25 cm, or an automated technique.
Yet important point... All wells can be drilled at once. But in some cases, it is advisable to drill one well at a time and immediately pour the concrete mixture (concrete). This is due to weather conditions in the form of rain or high groundwater levels. Water will wash away the soil of the borehole walls, as a result of which it will crumble, and we do not need this at all.
![]()

We make widening at the bottom of the wells
What is it for. A pillar heel will be formed along the widening in the well, which will perform 2 tasks: increasing the bearing capacity of the pillar and preventing the pile from pulling out by tangential forces during freezing of heaving soils.
Work plan. For this task, you can use a TISE drill specially designed for this purpose. It will allow you to make a broadening with a diameter of 40-60 cm. But it is worth noting that this device is very difficult to work in dense soil. Therefore, it is advisable to check everything during trial drilling during the design of the columnar foundation.
There is an alternative and budgetary way to make the broadening with an upgraded bayonet shovel. To do this, you need to cut the edges of the shovel blade so that the working area is within 10cm. Well, lengthen the handle of the shovel, if necessary. In order to raise the soil from such a widening, you can use some kind of device, or simply drill deeper and shove all the soil from our widening into this depression. The main thing is not to forget to tamp our "burial" later.

Creation of permanent formwork from roofing material
1. As a formwork for a bored foundation in this example, we will use the most economical option, namely roofing material.
We prepare a piece of roofing material of the required length. In our example, we need a piece 2m long (1.7m underground - 0.3m widening without roofing material + 0.3m above the ground + 0.3m margin for trimming by level). We twist the roofing material of the required diameter (25 cm) in the form of a pipe. For this task, it is better to use a certain template on which we will wind the roofing material. For example, we have a metal pipe. You can make the template yourself if you are smart. There are many options.
After the roofing material has been wound (2 layers thick), it is necessary to fix the resulting shirt from roofing material from unwinding. A wide packing tape will help us here. We will fasten it in 4 places (more is possible, the main thing is to be reliable). If you have roofing material with a dusty dusting, then the tape will not stick to it. There is an option to wrap a sleeve made of roofing material first with stretch film and then with tape. It will also give more rigidity to your formwork.

2. We attach the garbage bag to the bottom of the roofing felt formwork. What is it for. If you have high groundwater or just water from rain, then pouring concrete into the water is not recommended. Also, the package will be a kind of barrier between the soil environment and concrete. The package is not used by TISE technology. Cement milk falls directly into the ground, forming soil concrete, which is an additional reinforcement for the support (according to Yakovlev, the author of the TISE technology).
Do not confuse a garbage bag for a garbage can with a 120 l garbage bag, in which garbage is collected during subbotniks. It is large and dense enough. So we will use it. We attach it to the bottom of our formwork with tape. Our roofing felt formwork is movable, so try to use scotch tape so that it really fixes the package tightly (wrap the edge of the package tightly to the roofing felt shirt with tape). © www.site

3. That part of the package that we will use for widening can be neatly hidden in the formwork pipe.
Important! Consider the placement of the bag so that during the filling of the concrete there are no folds that can make our widening not a solid structure.

We create reinforcing cages for our piles
For this task, we will use a rebar with a diameter of 10mm. The reinforcement frame can be made in 2 versions: with the reinforcement of the pillar broadening and without the broadening reinforcement. How much reinforcement of the pillar broadening is needed is a controversial issue and can only be resolved as a result of accurate design calculations, taking into account all technical characteristics materials, loads and taking into account all possible factors. Therefore, in this article, we will follow the difficult path and consider a more reliable option for reinforcing the heel of the pillar.
Work plan. We prepare 4 rods with a length of about 2.4 m (1.65 m in the ground + 0.3 m above the ground + 0.3 for communication with the grillage + 0.1 m for the heel of the post). To reinforce the broadening of the column, we will bend the ends of the reinforcement so that it looks like a letter L. The length of the bend will depend on the diameter of the heel in the place where it will be reinforced (3-5 cm from the bottom of the broadening). In our case, the length of the fold is somewhere around 10-13cm. After the rods are ready, we sew them into a reinforcing cage. Welding here, of course, is not suitable, so we will tie it with a knitting wire. In this case, we make the connection not very strong so that it is possible to scroll the reinforcement along its axis. It is advisable to make notches at the ends of the top of the reinforcement, so that there is a guideline for how much to turn the reinforcement so that it is located in our widening at the desired angle.
If you decide to make a reinforcement cage without broadening reinforcement, then in this case we do everything the same as above, only we make the reinforcement connection rigid (welding or knitting wire).

Work plan for the formation of a pillar with broadening
1. We lower our formwork into the well to the end.

2. We will fill the pillar with concrete in two steps.
First, pour the concrete mixture to create the heel of the bored pile. It is not worth pouring a lot at once, since it will be difficult to lift the formwork and there will be too much load on the package. Adjust the fill to your liking.
To calculate the composition of concrete, we suggest using our service: Calculator for calculating the composition of concrete.

3. We raise our glass of roofing material up to the broadening height. As a result, the poured concrete fills the package and forms the heel of our pillar. Then we slightly press down the formwork.

4. We insert the reinforcing cage into the formwork and push it into the concrete solution to the depth we need.

5. Expand the reinforcement rods along the axis to reinforce the heel of the pillar. How to do this and how the heel reinforcement will look like, see the pictures below.


6. We bring the pillars to one level. When the concrete grasps a little and the formwork has already been fixed, we mark the general level of all bored piles using a laser level or a hydro level. In the form of a mark on the roofing felt formwork, you can use a self-tapping screw or a nail stuck into the formwork at the marked level. It is up to this mark that we will pour concrete into our piles.

7. Pour concrete up to the level marks with the obligatory compaction of the mortar using vibration or bayonet. For bayonetting, you can use the usual D10-D12 fittings. In order not to damage the above-ground part of the formwork during the pouring of concrete, a kind of removable rigid frame can be built. A piece is suitable for this role metal pipe, close to our formwork diameter. You can simply build a formwork from boards, which we will transfer from one pillar to another during pouring.

After pouring, the concrete must mature. In order to prevent it from drying out in the first days, you can pour wet sawdust on the top of the post and close it with a bag.


8. We cut our formwork to the marked level.

This is how the finished columnar foundation from bored piles will look like. © www.site

Conclusion
As you can see, the creation of a columnar foundation with your own hands is within the power of even one person. This is one of its main advantages, for those who like to do everything with their own hands without the involvement of hired forces and special equipment. Well, we must not forget that there is a significant saving in materials, in contrast to the strip foundation and even more so a monolithic slab.
It is economically effective to install bored piles only on clayey soils with a low GWL level, bedding of the bearing layer, not lower than 3 m.Already at 5 m, drilling wells with a diameter of 0.5 m becomes more expensive than making a pile-screw foundation or a floating slab.
Initially, in the literature and construction, piles were clearly distinguished by the method of their immersion:
- pile-support - the formwork is mounted on the bottom of the pit / pit, after stripping the concrete structure is filled up;
- pile-pillar - a composite, wooden, reinforced concrete element is installed in the well;
- bore injection - feeding concrete with a fine filler under pressure into a well of small diameter;
- rammed - the well was made not by drilling, but by compaction of the soil with a special tool, reinforced, poured with concrete;
- drilling - a drilled well with reinforcement installed inside is filled with concrete;
- driven - reinforced concrete product is pressed in, driven in or immersed in a vibration method.
At present, the installation of bored piles in private housing construction is carried out according to the drilling method, and it is necessary to call such piles - drilling, but among individual developers the name bored pile has stuck. Therefore, we will continue to use the established concept - bored piles, but keep in mind that from a professional point of view, this name is not correct.
Geological survey and calculation
According to the code of construction rules SP 24.13330 in relation to pile foundations, drilling and sounding are compulsory operations of geological surveys for any cottage. An exploration well is necessary for sampling soil from different depths. The type of sounding (dynamic or static) is selected based on the specific conditions of the project.

In the presence of man-made, loose, organic, weak, subsiding soils, the exploration well must go through them. Unlike the expensive geological survey (budget from 30 thousand rubles), there is a test screwing technology screw pile do it yourself. In this case, it will not be possible to determine the thickness of each layer and the composition of the soil. But it is possible to determine the depth of the formation with the bearing capacity.
If it does not exceed 3 m, piles-pillars can be laid in the project; in the calculations, take into account only the resistance of the soil under the heel of the pile. Substitute the minimum possible coefficient in the formula for the resistance of soils on the lateral surface, ensuring the safety margin of the foundation.
Unlike the strip foundation, the grillage technology does not allow communications to pass through it. Engineering systems are launched under the foundation, at least 0.5 m from the piles. If it is not possible to maintain the specified distance, the pipeline is laid in a cage, concreted in a trench for a length equal to three pile diameters in each direction.
Ground grillage technology is the simplest:
- the lower deck is missing;
- for laying concrete, it is enough to lean the side shields on the ground, reinforcing them with jibs, spacers.
However, in this case, the heaving forces that try to lift the grillage beams in winter can destroy the foundation. To avoid this, a fertile layer is removed under them to a depth of 10 - 20 cm, the trench is filled with sand. After stripping, the sand is removed from under the grillage, the space is protected sheet materialto prevent it from filling up with earth in case of accidental crumbling. This free space guarantees protection against heaving forces.

With a shallow grillage, it is very inconvenient to remove sand after stripping - you have to dig out the foundation from both sides. Therefore, another technology is used - a 5 cm layer of foam with a minimum density. During the swelling of soils, this material shrinks, and later partially restores its shape.
Using the above technology, a home craftsman will independently build a foundation from bored piles with a tape grillage without errors. The technology allows you to save 30 - 40% of the budget in comparison with other foundations.
Advice! If you need contractors, there is a very convenient service for their selection. Just send in the form below a detailed description of the work that needs to be done and you will receive offers with prices from construction teams and firms by mail. You can see reviews about each of them and photos with examples of work. It is FREE and non-binding.
Strip and columnar foundations are more traditional and understandable for the construction of baths in Russia, however, a more modern bored foundation has a number of advantages over them. And for areas on slopes and with problem soil, this is an ideal option. And for those places where construction is carried out especially dense, the foundation on bored piles allows you to build even a two-story bath without consequences for the soil and nearby buildings.
Features of the device of this design
The whole idea of \u200b\u200bthis miracle foundation is that the piles do not forcefully drive into the ground and do not damage the layers - they seem to "grow" out of the ground. In simple terms, a well is drilled in the soil, a pipe is placed in it or a removable formwork is made and all this is filled with mortar.
And for weak soils, a bored foundation with a grillage is the only possible option. After all, the main task of any piles and pillars is to lean on the hardest layer of soil - the incompressible one, which is always below the freezing level of groundwater. And it can be located deep enough due to the geology of some regions. It is precisely the bored piles that reach such a line - holding the entire newly built bathhouse on it.

Today, such a more expensive, but reliable zero level, as a pile foundation on bored piles with insulation, is also practiced. For this, expanded polystyrene is used, which, as you know, has a rigid structure. It is fixed directly on the waterproofing and covered with soil. In addition, expanded polystyrene in itself is an excellent shock absorber for the forces of heaving of the soil.
And most importantly, even a strip foundation on bored piles does not disturb the communications that were installed on the site even earlier. And the fact that the basement in such a building cannot be done later cannot be considered a problem for the bathhouse, because such a room is simply not traditional for it. The service life of such a foundation is also pleasing - more than a hundred years!
The order of construction work
You can build this solid and reliable foundation at any time of the year - and this is a valuable moment. But during construction it is necessary to strictly observe the technology, otherwise even small miscalculations will lead to serious consequences - and the strength of the structure itself will suffer first.
Step 1. Calculation of the future foundation
The width of such a foundation is calculated depending on the thickness of the future walls of the bath. So, for a frame structure, a particularly powerful zero level is not needed, because such walls are both light and thin. But for a real Russian steam room from a bar of bored, the foundation with your own hands will have to be done by 20-40 mm more so that the entire load is evenly distributed.

Step 2. Marking the site
The order of the piles on the site can be very different - both in the form of a solid wall, and in a checkerboard pattern or under certain sections of the bath.
Step 3. Drilling wells
A drilling machine can make one well in just a few hours. The most productive in Russia are Korean and Japanese pit drills, which allow building bored pile foundations in a short time.
Step 4. Formwork production
The next step is to build the formwork to create the well. It is necessary when the soil is not dense enough and can crumble. But under normal geological conditions, you can do without formwork, pouring concrete directly into the created well - which greatly facilitates the whole process. It will only be necessary to make a small formwork on the surface of the earth - it will then become the head for the pile. Such a formwork may well be a roofing material rolled into a pipe.
Step 5. Choosing piles
The piles themselves also need to be strong and durable - in terms of their bearing capacity, they should be of much better quality than conventional driven ones. Due to the simplicity of the construction of bored piles, it is possible to significantly limit earthworks, and the piles themselves do not need to be installed too much - not even on every square meter.
You can make piles with your own hands. Moreover, the piles are made right on the spot - and therefore there is no need to worry about the place of their storage. Bored piles are also popular in construction, the base of which is expanded to 50 cm. This is facilitated by special technological methods that allow such piles to have a bearing capacity of as much as 5 tons. On such a foundation, you can safely build a solid brick bath - with all the architectural delights.
Piles for the foundation can be made of a variety of materials - it all depends on the available soil density. So, if the soil on the site is clayey and oversaturated with moisture, then during the installation of the piles, the walls of the wells will have to be strengthened with special casing pipes, in extreme cases, when the budget is very limited - at least with clay solution. Thanks to these casing forms, the horizons of quicksand soils are overlapped and the foundation is absolutely safe. After all, both the depth and the width of the wells remain unchanged and not subject to deformation.
Step 6. Making a pillow
A pillow for such a foundation is a must. It is usually made from sand, gravel, or just concrete. The pillow is well compacted and then the well is already filled with the basic material.
Step 7. Reinforcement of the foundation
For additional strength of bored piles, reinforcement is often used, which is knitted into a single structure with the help of a grillage.
In order for the bored piles to be strong, reinforcing cages are made for them in advance - from rods with a diameter of 10-12 mm, tied in a special way. You can also use ready-made triangular frames, which are usually taken for floor beams.
Step 8. Installation of piles
Now piles are being prepared - their thickness and location directly depend on the project of the future bath. To accurately determine the length of the pile, use special equipment - hand drill or motor drill.
The depth of such piles should be at least 1.5 meters and more than the depth of soil freezing. But be sure to 10-15 cm more than the standard depth of soil freezing in a certain area. For which the correct calculation of such a foundation is needed. By the way, the depth of freezing of a certain area can be found on the geological map, or you can consult with local experts. This is important: if the base of the piles is below the freezing depth of the soil, then the entire foundation will not be “squeezed out” as soon as snow falls.
Another important point: about half a meter of piles will remain above the ground. They are filled with concrete, and as soon as it hardens, all the piles are finished with roofing material and combined with strapping.
Step 9. Well waterproofing
To prevent cement milk from absorbing into the soil, the walls of such wells must be lined in advance with strong plastic wrap or roofing felt, which is even better. If the first option is used, then it is better to first weld the film and make a cover out of it - it will become a good waterproofing for the foundation. But this method is only suitable for really solid soil. In all other cases, metal, cardboard and asbestos-cement pipes are more suitable as formwork.
Step 10. Pouring concrete into the wells
The most convenient way is to pour concrete from a mixer. After all, this is how you can handle quite large volumes in a day.
The bored foundation is filled with traditionally fast-setting cement, which is diluted small portions - every time, as soon as the previous layer is rammed.
It is possible to fill the wells of bored foundations with concrete or concrete mixed with stone: cobblestone, limestone or sandstone. There is only one requirement for such a filler: that it be strong and even, i.e. rubble stone.
And in order for the concrete in the well to be compacted more densely, a special drill is used - it creates the necessary mechanical vibration. After all, the main thing during construction is to completely eliminate even the smallest voids in the piles. For this, only high-quality hydro-technical concrete is used, and it is fed into the form of piles by a special hydraulic machine - it is she who provides the required level of pressure.
That's all - all that remains is to make a high-quality grillage, and you can safely build a solid bath!